When working on Arduino projects, there often arises a need to store data persistently. For instance, you might want to save user preferences, configuration settings, or sensor calibration data that should remain available even after the Arduino is powered off. This is where EEPROM (Electrically Erasable Programmable Read-Only Memory) comes in handy. In this blog post, we’ll delve into what EEPROM is, how it works in the context of Arduino, and provide a practical example to get you started.
What is EEPROM?
EEPROM is a type of non-volatile memory that retains its data even when the power is turned off. Unlike the volatile memory (RAM) used for temporary storage during program execution, EEPROM allows data to persist between sessions. This makes it ideal for applications where you need to save small amounts of data permanently.
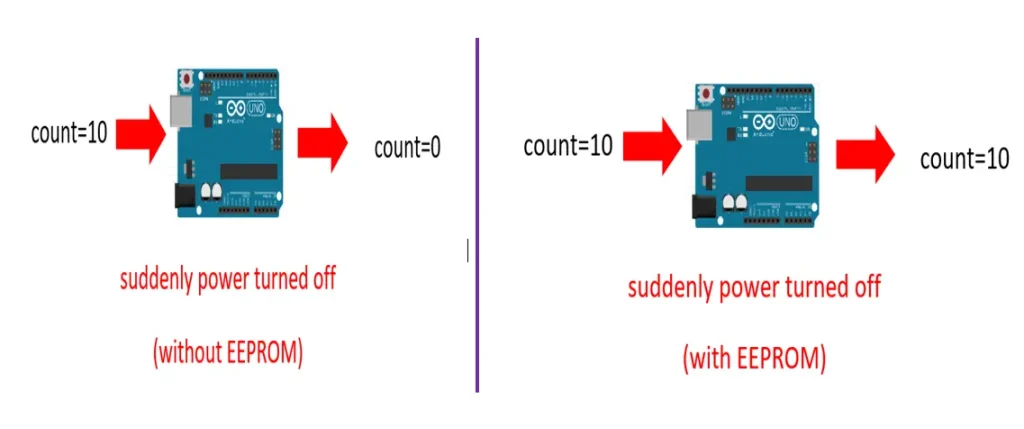
For example, if you want to count something so that you power on your Arduino board and it starts counting, then suddenly your power is turned off, and then after powering on the Arduino again, you lose your counting data because you didn’t use EEPROM. If you use EEPROM, Arduino will start counting from before losing power. In other words, you never lose your data.
Arduino EEPROM Basics
Most Arduino boards come with a built-in EEPROM, although the size may vary. Each Arduino board comes with a different size of EEPROM. For example, the popular Arduino Uno has 1 KB of EEPROM.
| Arduino Uno | 1KB (1024 bytes) |
| Arduino Mega | 4 KB (4096 bytes) |
| Arduino Nano | 1 KB (1024 bytes) |
The EEPROM on these boards is byte-addressable, meaning each address can store one byte of data. That means one address can store 0 to 255(2^8) integer value. This granularity allows you to read and write individual bytes, which is useful for small and frequent data updates.
Accessing EEPROM in Arduino
The Arduino library EEPROM.h provides easy-to-use functions to read and write data to the EEPROM.
Key Functions of Arduino EEPROM Library:
EEPROM.read(address): Reads a byte from the specified address.
EEPROM.write(address, value): Writes a byte to the specified address.
EEPROM.update(address, value): Writes a byte only if the value is different from the current value.
EEPROM.put(address, value): Writes any data type or object to the EEPROM.
EEPROM.get(address, value): Reads any data type or object from the EEPROM.
Arduino EEPROM Project
In this project, we will understand how Arduino EEPROM works. We count a button state using a push button and an Arduino Uno. Every time we save the button’s last state using EEPROM.write() function and read that using EEPROM.read() function from a specific address.
We will turn off the power of the Arduino, then turn on the Arduino power, and we will see the Arduino print the last button state. This is impossible without EEPROM.
Component List
| Component Name | Quantity |
|---|---|
| Arduino Uno | 1 |
| Push Button | 1 |
| 4.7K Resistor | 1 |
| Jumper wires | 1 |
Circuit Diagram
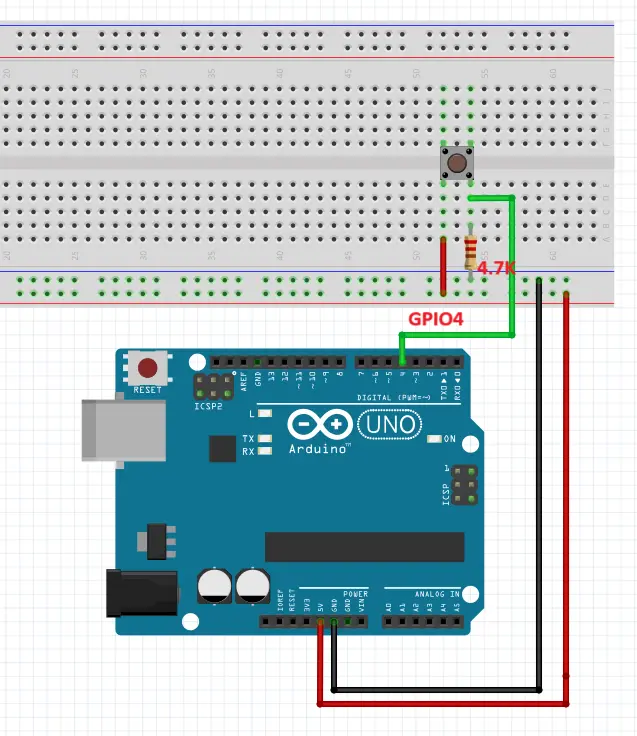
Full Code
This Arduino sketch counts the number of times a button connected to pin 4 is pressed and stores that count in EEPROM memory. It also includes a debouncing mechanism to ensure accurate button press counting by filtering out noise from the button.
#include <EEPROM.h>
#define buttonPin 4
unsigned int stateCount;
int buttonState;           // the current reading from the input pin
int lastButtonState = LOW;  // the previous reading from the input pin
long lastDebounceTime = 0;  // the last time the output pin was toggled
long debounceDelay = 50;


void setup() {
  Serial.begin(9600);
  pinMode(buttonPin,OUTPUT);
  // put your setup code here, to run once:
  stateCount = EEPROM.read(0);

}

void loop() {

 // read the state of the switch into a local variable:
  int reading = digitalRead(buttonPin);

  if (reading != lastButtonState) {
    // reset the debouncing timer
    lastDebounceTime = millis();
  }

  if ((millis() - lastDebounceTime) > debounceDelay) {
    // whatever the reading is at, it's been there for longer than the debounce
    // delay, so take it as the actual current state:

    // if the button state has changed:
    if (reading != buttonState) {
      buttonState = reading;

      // only toggle the LED if the new button state is HIGH
      if (buttonState == 1) {
        stateCount++;
      }
    }
  }
  EEPROM.write(0,stateCount);
  Serial.print("The Last State of the Button is: ");
  Serial.println(stateCount);
  lastButtonState = reading;
  delay(100);

}
Code Explanation
Including the EEPROM Library
First, include the EEPROM library, which provides functions for reading from and writing to the EEPROM memory:
#include <EEPROM.h>
Defining Constants and Variables
Next, define the constants and variables used in the sketch.
#define buttonPin 4
unsigned int stateCount;
int buttonState;
int lastButtonState = LOW;
long lastDebounceTime = 0;
long debounceDelay = 50;
- buttonPin: The pin number where the button is connected.
- stateCount: Keeps track of the button presses.
- buttonState and lastButtonState: Hold the current and previous states of the button.
- lastDebounceTime: Records the last time the button state was changed.
- debounceDelay: Sets the debounce time, the minimum interval to consider the button state stable.
Setup Function
The setup function initializes serial communication, sets the button pin as an input, and reads the stored count from EEPROM using EEPROM.read() function.
void setup() {
  Serial.begin(9600);
  pinMode(buttonPin, INPUT);
  stateCount = EEPROM.read(0);
}
Loop Function
The loop function handles reading the button state, debouncing, updating the count, writing to EEPROM, and printing the count:
void loop() {
  int reading = digitalRead(buttonPin);
  if (reading != lastButtonState) {
    lastDebounceTime = millis();
  }

  if ((millis() - lastDebounceTime) > debounceDelay) {
    if (reading != buttonState) {
      buttonState = reading;
      if (buttonState == HIGH) {
        stateCount++;
      }
    }
  }

  EEPROM.write(0, stateCount);
  Serial.print("The Last State of the Button is: ");
  Serial.println(stateCount);
  lastButtonState = reading;
  delay(100);
}
The button state is read and stored in the reading variable using digitalRead() function. Then, If the current reading differs from the last reading, the debounce timer (lastDebounceTime) is reset to the current time. If the time since the last state change is greater than the debounce delay, the button state is considered stable. If the stable state is different from the last known state, the button state is updated.
If the button is pressed (state is HIGH), the stateCount is incremented. The updated count (stateCount) is written to EEPROM memory at address 0. The current count is printed to the Serial Monitor. The last button state is updated to the current reading. A short delay (100 milliseconds) is added to reduce the frequency of updates to the Serial Monitor.
Uploading the Code
Select the write board in Arduino IDE. Go to tools>>board>>Arduino AVR boards and select Arduino Uno. Then compile then code. After successful uploading select the right port from Tools>>port>>select the right port(COM4 or COM2.. etc.) in Arduino IDE. Hit the upload button to upload the code.
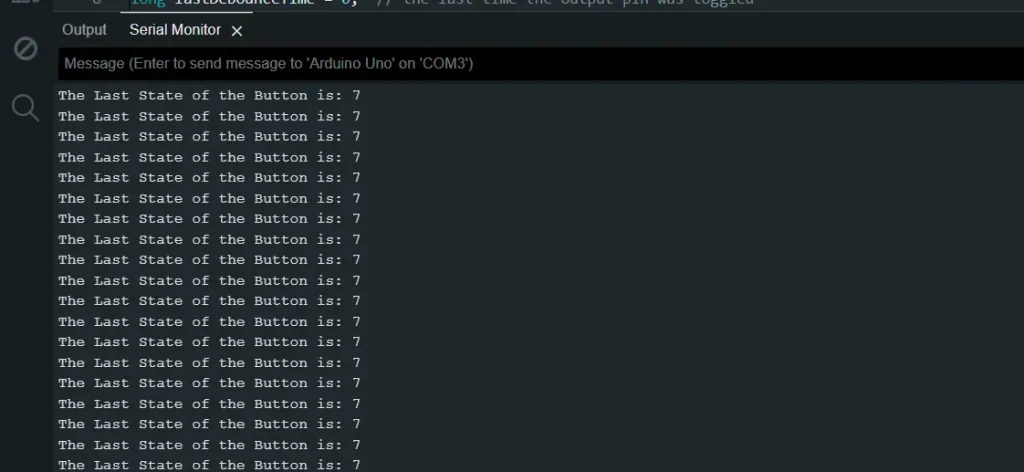
The Result
Open your serial monitor in the Arduino IDE. And press button 3 or 4 or more, and you will see the current button state on the serial monitor. After that, remove the USB cable and reconnect the USB cable, and you will see the last button state on the serial monitor, which is the same as disconnecting the Arduino board.