
If you’re developing projects in the world of IoT or embedded systems, ArduinoJson is an essential library to have in your toolkit. With its ability to efficiently parse, serialize, and deserialize JSON data in memory-constrained environments, it’s the perfect solution for managing structured data on microcontrollers. Compatible across all Arduino architectures, ArduinoJson offers powerful features for optimizing data exchange between devices, servers, and applications. In this guide, you’ll discover how to get started with ArduinoJson, explore its key features, and learn how to use it for real-world applications
What is JSON?
JSON (JavaScript Object Notation) is a lightweight data-interchange format that is easy for humans to read and write and easy for machines to parse and generate. It is commonly used to transmit data between a server and a web application, as well as for configuration files or data storage in many programming environments.
Key points of JSON
- Data Format: JSON represents data as key-value pairs, similar to how dictionaries or hash maps work in many programming languages.
- Structure: The structure consists of:
- Objects: Represented as a collection of key-value pairs enclosed in curly braces
{}. - Arrays: Ordered lists of values, enclosed in square brackets
[]. - Values: Can be strings, numbers, arrays, booleans (
trueorfalse),null, or other JSON objects.
- Objects: Represented as a collection of key-value pairs enclosed in curly braces
Example of a JSON object
{
  "name": "Alamin",
  "age": 25,
  "is_student": true,
  "courses": ["Business", "Finance", "Marketing"],
  "address": {
    "city": "Dhaka",
    "country": "Bangladesh"
  }
}
In this example:
name,age, andis_studentare key-value pairs.coursesis an array.addressis another JSON object.
JSON is widely used in data transmission because it is language-agnostic and simple to use for both humans and computers.
ArduinoJson Library
ArduinoJson is a general and effective addition to the Arduino library (compatible with all architectures) for embedded C++ in the Arduino family, while “Benoit Blanchon,” the primary author of ArduinoJson, has introduced it with the Arduino family. The latest edition of the ArduinoJson library is ArduinoJson 7.1.0, published on 27 June 2024; on the other hand, the oldest version, ArduinoJson 4.0.0, is available on the official site of Arduino. The main purpose of ArduinoJson is to parse, generate, serialize, and deserialize JSON data efficiently in memory-constrained environments, which makes it exceptionally popular among embedded systems developers.
For instance, in Arduino projects, parsing and serialization are important for exchanging structured data among connected devices and systems such as a web server, a cloud service, or a smartphone application. Additionally, libraries like ArduinoJson are optimized for low memory usage, which is crucial for running on microcontrollers with limited RAM.
Installing ArduinoJson Library
The most recent version of the ArduinoJson library can be found on the Arduino website (www.arduino.cc). Via the Arduino IDE, you can download.
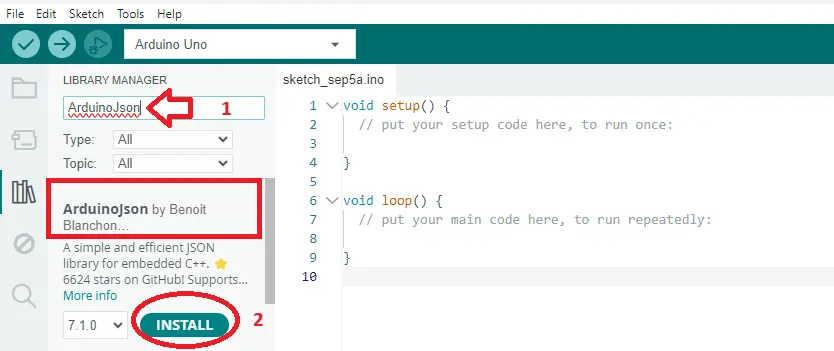
Open the Arduino IDE, select Sketch -> Include Library -> Manage Libraries, then search for “ArduinoJson” to install the library. Install Benoit Blanchon’s ArduinoJson library after that. Restart the Arduino IDE after the installation is finished.
Key features and usages of ArduinoJson
In this article, we will explore key features of ArduinoJson and their applications in Arduino projects. Parsing and serialization are critical operations when working with ArduinoJSON. These operations, along with JSON objects and deserialization, are essential for effective data exchange between a client and server, especially in web applications. JSON objects facilitate the structured transfer of data, making these features particularly valuable for modern IoT and web-based applications.
JSON Object
JSON Object is a lightweight data-interchange format that is readable and writeable for humans and easy for machines to parse and generate. A JSON object is essentially an unordered collection of key/value pairs.
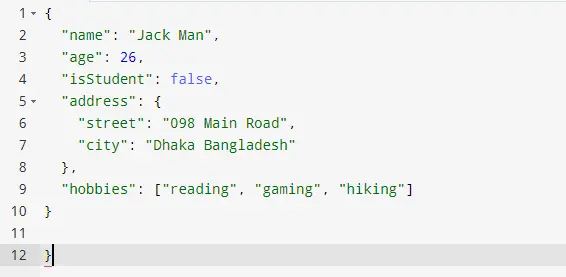
In this example:
- “name” is a key with the value “Jack Man” (a string).
- “age” is a key with the value 26 (a number).
- “isStudent” is a key with the value false (a boolean).
- “address” is a key with a value that is another JSON Object.
- “hobbies” is a key with a value that is a JSON array containing strings.
Serialization
Data must be converted into the desired (JSON) format before exchanging among deceives and servers in this regard. The serialization process is used to serialize data into JSON using Arduino JSON. The “serializeJson()” function is Converts the doc object into a JSON-formatted string and sends it to the serial output. This is the actual serialization process, where the internal representation of the JSON document is converted into a human-readable JSON string.
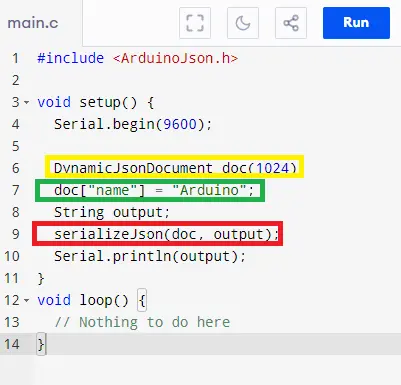
- DynamicJsonDocument: creates a JSON document in memory.
- doc[“key”] = value: adds data to the JSON document.
- serializeJson(doc, output): converts the JSON document to a string
Deserialization
Converting a JSON-encoded string back into a usable data structure (like a JSON document) is called Deserialization in ArduinoJson. This process is useful for extracting and working with data that comes from external sources, such as a server or a sensor. Then, you must declare a variable to store the deserialized document “DynamicJsonDocument doc” . You have to call “deserializeJson(doc, json); ” for passing the JsonDocument as the first argument and the JSON input as the second.
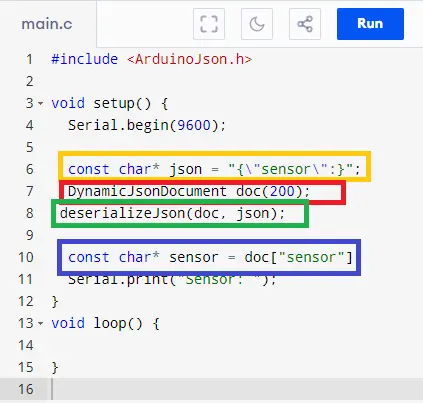
- const char* json {“sensor “} : The JSON string representing a temperature sensor’s data.
- DynamicJsonDocument doc(200) : Creates a dynamic JSON document with a capacity of 200 bytes. The capacity should be chosen based on the size of the JSON data you expect to handle
- deserializeJson(doc, json) : Arses the JSON string and stores the resulting data in the doc JSON document.
- doc[“sensor ”] : Access the data using keys.
Advanced Features & Performance Optimization
Arduinojashon has a lot of advanced features and can provide optimistic support for embedded systems engineers in developing projects such as
Input filter
An input filter can be used to parse a JSON document only, neglecting the rest of the document. This can be very useful when working with large JSON documents and just require access to specific fields. RAM can also be saved by using it.
JsonDocument filter;
filter["list"][0]["temperature"] = true;
deserializeJson(doc, input, DeserializationOption::Filter(filter)); ( Applies the filter during the deserialization process)
Efficient
- ArduinoJson has double the size.
- ArduinoJson functions nearly 10% quicker.
- RAM usage for ArduinoJson is about 10% lower.
Portable
Making Arduino JSON portable refers to writing code that can be executed without modification on a variety of platforms and settings (such as different microcontrollers, operating systems, or even desktop programs). This is particularly useful when writing code or libraries that could be used on multiple platforms.
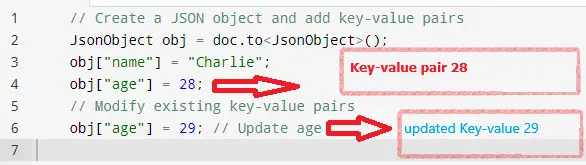
Key Value Pairs
Handling key-value pairs is essential to ArduinoJson in order to generate and parse JSON data. This comprehensive guide covers key-value pair operations, such as managing, updating, and accessing them.
To efficiently handle key-value pairs with ArduinoJson you have to follow few specifications as follows:
- for managing JSON data you have to use “DynamicJsonDocument “ or StaticJsonDocument
- “[] ”operators use for Access and modify key-value pairs with
- Using “containsKey() “ you may Check for the existence of keys
- Iterate over key-value pairs with a range-based for loop.
- Serialize JSON documents with “serializeJson()” to convert them back to strings.
- Handle nested objects by chaining” []” operators
For insistence, With the help of Jsonobject you can modify a Key value Pairs
Practical Examples
In this section, we will coverup a particle project where Arduino Uno generates random numbers for simulated light-level data and ESP receives the simulated data from the Arduino Uno, formats it as JSON using Arduino JSON, and prints it to the serial monitor. In this project, for better understanding for the reader, we negated a server modification for sending or receiving data.
Component List
| Name of Component | Quantity | Purchase Links |
|---|---|---|
| Arduino Uno | 1 | Amazon |
| ESP32 | 1 | Amazon |
| Jumper Wires set | 1 | Amazon |
| USB Cables | 2 | Amazon |
| Resistors | 2 | Amazon |
| Breadboard | 2 | Amazon |
Circuit Design (Energized)

Circuit Schematics
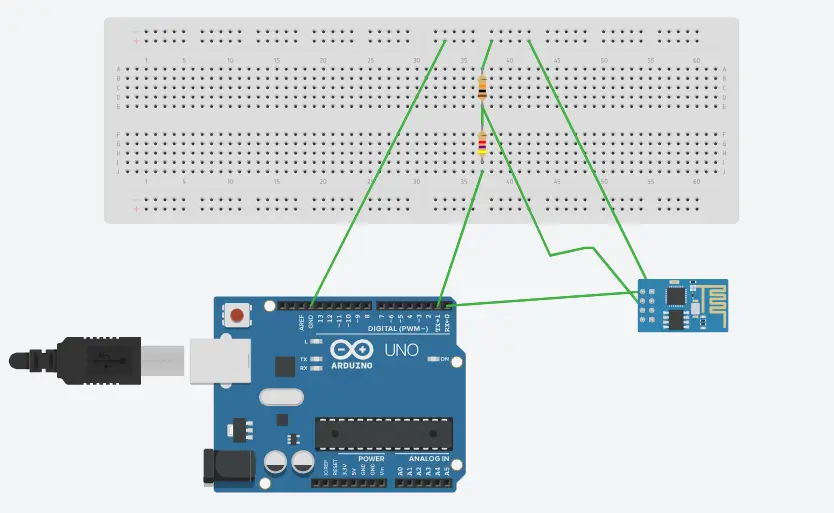
Connection description between Arduino and ESp32
| Arduino Uno Pin | ESP32 Pin |
|---|---|
| TX (Pin 1) | RX2 (GPIO 16) |
| RX (Pin 0) | TX2 (GPIO 17) |
| GND | GND |
| Independent USB Cable for power and upload code | Independent USB Cable for power and upload code |
Don’t forget to connectthe junction between R1 and R2 to the RX2 (GPIO 16) pin of the ESP32.
Arduino Uno Code
This code has to be complied and upload in Arduino Uno
//Code for Arduino UNO(ArduinoJson)
#include <ArduinoJson.h>

// Use Serial for communication with ESP32
void setup() {
  Serial.begin(115200);  // Start Serial communication with the ESP32
}

void loop() {
  // Example data that you might send to the ESP32
  int sensorValue = analogRead(A0);

  // Create a JSON document
  StaticJsonDocument<200> jsonDoc;
  jsonDoc["sensor_value"] = sensorValue;

  // Serialize JSON to string
  String jsonOutput;
  serializeJson(jsonDoc, jsonOutput);

  // Send JSON data over Serial to ESP32
  Serial.println(jsonOutput);

  delay(1000);  // Wait for 1 second before sending the next data
}
ESP32 Code
This code has to be complied and upload in ESP32
//Code for ES32(ArduinoJson)
#include <ArduinoJson.h>

void setup() {
  Serial.begin(115200);  // Start Serial communication with Arduino Uno
}

void loop() {
  // Check if data is available
  if (Serial.available()) {
    String jsonInput = Serial.readStringUntil('\n');  // Read the JSON data sent from Arduino Uno

    // Create a JSON document
    StaticJsonDocument<200> jsonDoc;

    // Parse the JSON inputar
    DeserializationError error = deserializeJson(jsonDoc, jsonInput);

    // Check for errors in deserialization
    if (error) {
      Serial.println("Failed to parse JSON");
      return;
    }

    // Extract the sensor value from the JSON document
    int sensorValue = jsonDoc["sensor_value"];
    Serial.print("Received sensor value: ");
    Serial.println(sensorValue);
  }
}
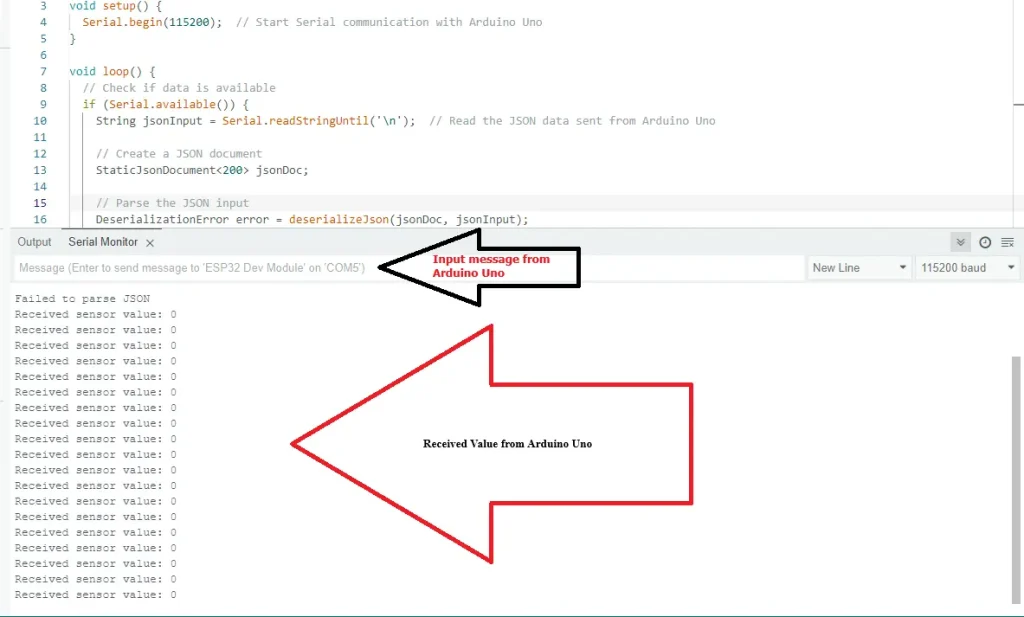
Output
After uploading code in both Arduino uno and ESP32 result showing in serial monitor that who data is transferring from one platform to another one.
Conclusion
The ArduinoJSON library is widely used in the IOT industry with its useful features for modern embedded system engineers. This article focuses on the basic and operations parts of ArduinoJSON so visitors can enrich their knowledge on the ArduinoJSON library. Readers can learn more from https://arduinojson.org/
for further study and a few other features of ArduinoJSON.