
In this article we will discussed how to configure Bluetooth Low Energy where one ESP32 will work as client and another one act as a server. The BLE server advertises characteristics that include sensor readings that the client can view. The ESP32 BLE client reads the values of the characteristics (temperature and humidity) and displays them on the serial monitor.

What is Bluetooth Low Energy?
The wireless communication technology BLE stands as an optimal choice for sensors and fitness trackers and smart home devices because of its exceptional power efficiency. BLE differs from Bluetooth Classic since it operates through short data transmissions followed by energy-saving sleep states instead of maintaining continuous data transfer like Bluetooth Classic.
BLE devices maintain power through low-power operation that enables them to operate with tiny batteries lasting months up to years. The protocol levels of BLE and Bluetooth Classic operate independently from each other because they use different frequency bands. BLE operates optimally when users need devices to function for extended durations while maintaining sporadic data exchange yet Bluetooth Classic delivers superior performance for maintaining uninterrupted connections coupled with rapid data flow.
Server and client mode
A BLE server (also called a peripheral) is a device that holds data and advertises its availability. It typically has sensors or control parameters that a client can read or modify. The server does not initiate communication but responds to client requests.
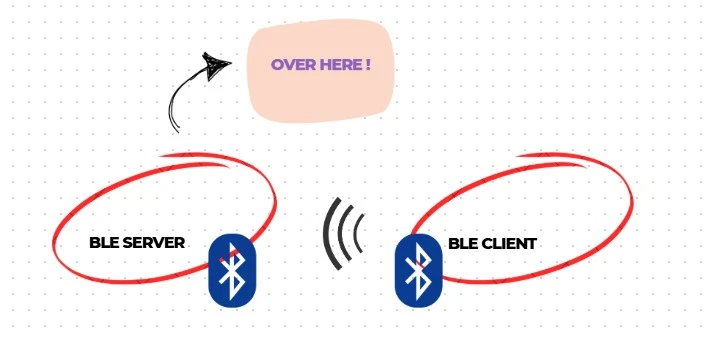
A BLE client (also called a central) is a device that initiates communication by scanning for advertising BLE servers and establishing a connection. The client can then read data, write data, or subscribe to notifications from the server.
GATT
The Bluetooth Low Energy (BLE) communication framework known as GATT (Generic Attribute Profile) defines how devices communicate data using a client-server architecture. In this model, the server holds data, organizes it into services and characteristics, and the client reads or writes this data. GATT is crucial for BLE applications such as wearables, sensors, and Internet of Things devices because it guarantees effective, structured, and low-power communication.
- Profile: A collection of services for environmental data. Example: Weather Profile.
- Service: A group of related data, like temperature and humidity. Example: Environmental Sensor Service.
- Characteristic: The actual data (value) stored in a service. Example: Temperature Characteristic and Humidity Characteristic
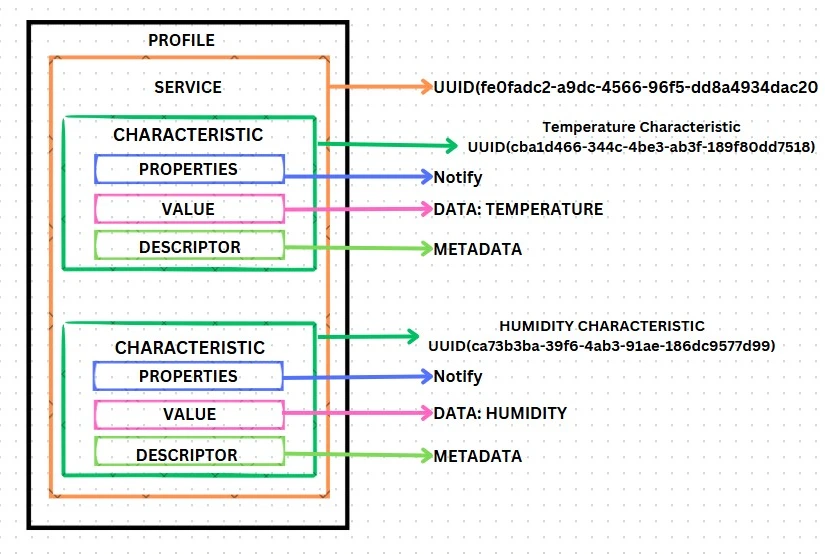
- Descriptor: Extra information about the characteristic. Example: Unit of measurement (°C for temperature, % for humidity).
- Properties: Defines how you can use the characteristic. Example: Read, Write, Notify, Indicate.
In this example, we define a service that includes two characteristics: one for temperature and another for humidity. The real-time temperature and humidity readings are stored as values within their respective characteristics. Each characteristic is configured with the notify property, enabling automatic updates to the client whenever the values change.
UUID
The 128-bit Universally Unique Identifier (UUID) for instance,
5d96abae-c54a-40b1-ab17-19e45791fe2c
is a tool used by Bluetooth Low Energy (BLE) to distinguish between GATT (Generic Attribute Profile) services, features, and descriptions. The system allows devices to find the right data while preventing conflicts, resulting in a straightforward device connection. BLE uses standard 16-bit UUIDs for specific services (e.g., 0x180D for Heart Rate) and custom 128-bit UUIDs for special applications. BLE temperature sensors require two separate UUIDs: one for temperature data service identification and one for reading storage. UUIDs are required for proper identification and interaction with BLE services in order to establish seamless device connectivity.
You generate one for your from here: https://www.uuidgenerator.net/version4#google_vignette
Project Highlights
In this section, we will show how to configure Esp32 BLE as server and Client using Arduino IDE. One MCU will work as a BLE server and other one will be act as a BLE client.

The ESP32 BLE server is connected to a DHT and it updates its temperature and humidity characteristic values every 20 seconds.
The ESP32 client connects to the BLE server and it is notified of its temperature and humidity characteristic values. This ESP32 is connected to an PC and it prints the latest readings in serial monitor.
This project is divided into two parts:
- Esp32 as BLE Server
- Esp32 as BLE Client
Required Components
| Component Name | Quantity | Purchase Link |
| ESP32 development board | 2 | Amazon | AliExpress |
| DHT11 | 1 | Amazon | AliExpress |
| Connecting wire pack | 1 | Amazon | AliExpress |
| Breadboard | 2 | Amazon | AliExpress |
Affiliate Disclosure: When you click on links to make a purchase, this can result in this website earning a commission.
ESP32 BLE Server
In this section, we’ll configure the BLE Server to broadcast a service that includes two characteristics: one for temperature and another for humidity. These characteristics are equipped with the Notify property, enabling them to send updates to the client whenever new values are available.
Schematic Diagram
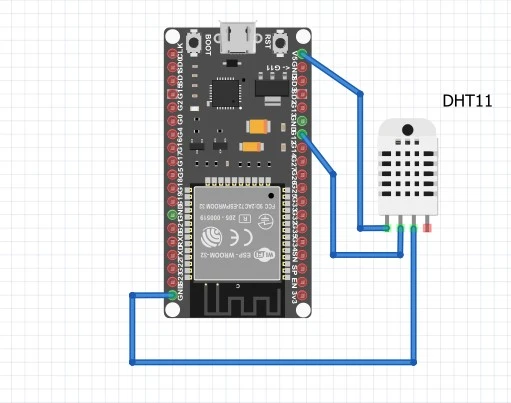
The ESP32 BLE server will advertise characteristics for temperature and humidity readings from a DHT11 sensor. You can use any other sensor as long as you modify the code accordingly.
In this setup, the DHT11 sensor’s data pin is connected to GPIO 21 of the ESP32. The sensor is also properly powered with VCC and GND connections to ensure stable operation.
ESP32 BLE Server – Code
Once the circuit is set up and the necessary libraries are installed, copy the following code into the Arduino IDE.
To create a project in Arduino IDE for ESP32, please visit our previous tutorial. The link is given below:
#include <BLEDevice.h>
#include <BLEServer.h>
#include <BLEUtils.h>
#include <BLE2902.h>
#include <DHT.h>

#define DHTPIN 21     // DHT11 Data Pin connected to GPIO21
#define DHTTYPE DHT11 // DHT sensor type

DHT dht(DHTPIN, DHTTYPE);

// BLE Server Name
#define bleServerName "DHT11_ESP32"

// Custom BLE Service UUID
#define SERVICE_UUID "fe0fadc2-a9dc-4566-96f5-dd8a4934dac2"

// Temperature and Humidity Characteristics
BLECharacteristic temperatureCharacteristic("cba1d466-344c-4be3-ab3f-189f80dd7518", BLECharacteristic::PROPERTY_NOTIFY);
BLECharacteristic humidityCharacteristic("ca73b3ba-39f6-4ab3-91ae-186dc9577d99", BLECharacteristic::PROPERTY_NOTIFY);

// Timer Variables
unsigned long lastTime = 0;
const unsigned long timerDelay = 10000; // 10 seconds

bool deviceConnected = false;

// BLE Callbacks
class MyServerCallbacks: public BLEServerCallbacks {
  void onConnect(BLEServer* pServer) {
    deviceConnected = true;
  };
  void onDisconnect(BLEServer* pServer) {
    deviceConnected = false;
  }
};

void setup() {
  Serial.begin(115200);
  dht.begin();

  // Create BLE Device
  BLEDevice::init(bleServerName);

  // Create BLE Server
  BLEServer *pServer = BLEDevice::createServer();
  pServer->setCallbacks(new MyServerCallbacks());

  // Create BLE Service
  BLEService *sensorService = pServer->createService(SERVICE_UUID);

  // Add Characteristics & Descriptors
  sensorService->addCharacteristic(&temperatureCharacteristic);
  sensorService->addCharacteristic(&humidityCharacteristic);

  temperatureCharacteristic.addDescriptor(new BLE2902());
  humidityCharacteristic.addDescriptor(new BLE2902());

  // Start the Service
  sensorService->start();

  // Start Advertising
  BLEAdvertising *pAdvertising = BLEDevice::getAdvertising();
  pAdvertising->addServiceUUID(SERVICE_UUID);
  pServer->getAdvertising()->start();
  Serial.println("Waiting for client connection...");
}

void loop() {
  if (deviceConnected && (millis() - lastTime) > timerDelay) {
    // Read Temperature & Humidity from DHT11
    float temp = dht.readTemperature();
    float hum = dht.readHumidity();

    if (!isnan(temp) && !isnan(hum)) {  // Ensure valid readings
      // Send Temperature Data
      char tempStr[6];
      dtostrf(temp, 4, 2, tempStr);
      temperatureCharacteristic.setValue(tempStr);
      temperatureCharacteristic.notify();
      Serial.print("Temperature: ");
      Serial.print(temp);
      Serial.println(" °C");

      // Send Humidity Data
      char humStr[6];
      dtostrf(hum, 4, 2, humStr);
      humidityCharacteristic.setValue(humStr);
      humidityCharacteristic.notify();
      Serial.print("Humidity: ");
      Serial.print(hum);
      Serial.println(" %");
    } else {
      Serial.println("Failed to read from DHT sensor!");
    }

    lastTime = millis();
  }
}
You can upload the code, and it will immediately start advertising its service with the temperature and humidity characteristics. If you’re interested in understanding how the code functions, keep reading; otherwise, you can skip ahead to the Client section. There are various examples demonstrating how to use BLE with the ESP32 in the Examples section. In your Arduino IDE, navigate to File > Examples > ESP32 BLE Arduino. This server sketch is derived from the Notify example.
How programs work
Importing Libraries
The code begins by importing the necessary libraries required for Bluetooth Low Energy (BLE) communication and the DHT sensor.
#include <BLEDevice.h>
#include <BLEServer.h>
#include <BLEUtils.h>
#include <BLE2902.h>
#include <DHT.h>
BLEDevice.h, BLEServer.h, BLEUtils.h, BLE2902.h – These libraries enable ESP32 to act as a BLE server. DHT.h – This library is used to interface with the DHT11 temperature and humidity sensor.
Defining DHT Sensor Configuration
#define DHTPIN 21     // DHT11 Data Pin connected to GPIO21
#define DHTTYPE DHT11 // DHT sensor type
DHT dht(DHTPIN, DHTTYPE);
DHTPIN – The data pin of the DHT11 sensor is connected to GPIO21 of the ESP32. DHTTYPE – Specifies the sensor type as DHT11. Then, an instance of the DHT sensor is created.
BLE Server Name
#define bleServerName "DHT11_ESP32"
This line defines a name for the BLE server. If changed, the client-side code must also be updated. The ESP32 BLE server is named “DHT11_ESP32”.
BLE UUIDs
Each BLE service and characteristic requires a unique identifier (UUID). This SERVICE_UUID uniquely identifies our BLE service. The following lines define BLE characteristics for temperature and humidity readings. These characteristics allow notification-based communication. PROPERTY_NOTIFY ensures that connected BLE clients receive updated sensor values when available.
#define SERVICE_UUID "fe0fadc2-a9dc-4566-96f5-dd8a4934dac2"
BLECharacteristic temperatureCharacteristic("cba1d466-344c-4be3-ab3f-189f80dd7518",
BLECharacteristic::PROPERTY_NOTIFY);
BLECharacteristic humidityCharacteristic("ca73b3ba-39f6-4ab3-91ae-186dc9577d99",
BLECharacteristic::PROPERTY_NOTIFY);
I recommend keeping all the default UUIDs. If you change them, you’ll also need to update the code on the client side to ensure that it can locate the service and retrieve the characteristic values.
Timer Variables
A timer mechanism is implemented to control how frequently data is transmitted. TimerDelay – Data will be updated every 10 seconds. The deviceConnected flag tracks whether a BLE client is connected to the ESP32 server.
unsigned long lastTime = 0;
const unsigned long timerDelay = 10000; // 10 seconds
bool deviceConnected = false;
BLE Server Callbacks
A callback function is implemented to track when a client connects or disconnects. When a client connects, deviceConnected is set to true. When the client disconnects, it resets to false.
class MyServerCallbacks: public BLEServerCallbacks {
  void onConnect(BLEServer* pServer) {
    deviceConnected = true;
  };
  void onDisconnect(BLEServer* pServer) {
    deviceConnected = false;
  }
};
setup () Function
The setup() function initializes BLE, the DHT sensor, and starts BLE advertising.
Serial.begin(115200);
dht.begin();
BLEDevice::init(bleServerName);
Create the BLE Server and Set Callback
BLEServer *pServer = BLEDevice::createServer();
pServer->setCallbacks(new MyServerCallbacks());
A BLE server instance is created. The MyServerCallbacks() function is assigned to track connection status.
Create a BLE Service & Add BLE Characteristics
BLEService *sensorService = pServer->createService(SERVICE_UUID);
sensorService->addCharacteristic(&temperatureCharacteristic);
sensorService->addCharacteristic(&humidityCharacteristic);
BLE2902 descriptors allow clients to receive notifications.
temperatureCharacteristic.addDescriptor(new BLE2902());
humidityCharacteristic.addDescriptor(new BLE2902());
Start the Service and Advertise BLE
sensorService->start();
BLEAdvertising *pAdvertising = BLEDevice::getAdvertising();
pAdvertising->addServiceUUID(SERVICE_UUID);
pServer->getAdvertising()->start();
Serial.println("Waiting for client connection...");
sensorService->start() activates the service.pServer->getAdvertising()->start() makes the ESP32 discoverable by BLE client
loop() Function
Read Temperature & Humidity from DHT11
float temp = dht.readTemperature();
float hum = dht.readHumidity();
Reads temperature and humidity values from the DHT11 sensor. Stores the values in temp and hum variables.
Validate Sensor Readings
if (!isnan(temp) && !isnan(hum)) {
Checks if the sensor readings are valid. If the readings are NaN (Not a Number), it skips sending the data.
Send Data via BLE
char tempStr[6], humStr[6];
dtostrf(temp, 4, 2, tempStr);
dtostrf(hum, 4, 2, humStr);

temperatureCharacteristic.setValue(tempStr);
temperatureCharacteristic.notify();
humidityCharacteristic.setValue(humStr);
humidityCharacteristic.notify();
Converts float values into character arrays for BLE transmission. Updates BLE characteristics with the new values. Notifies the connected BLE client with the latest sensor data.
Print Readings to Serial Monitor
Serial.print("Temperature: "); Serial.print(temp); Serial.println(" °C");
Serial.print("Humidity: "); Serial.print(hum); Serial.println(" %");
Prints the temperature and humidity values to the Serial Monitor.Helps with debugging and monitoring sensor performance.
Update the Timer
lastTime = millis();
ESP32 BLE Server Test
Flash the code to your board and open the Serial Monitor. You will see a message similar to the one shown below.

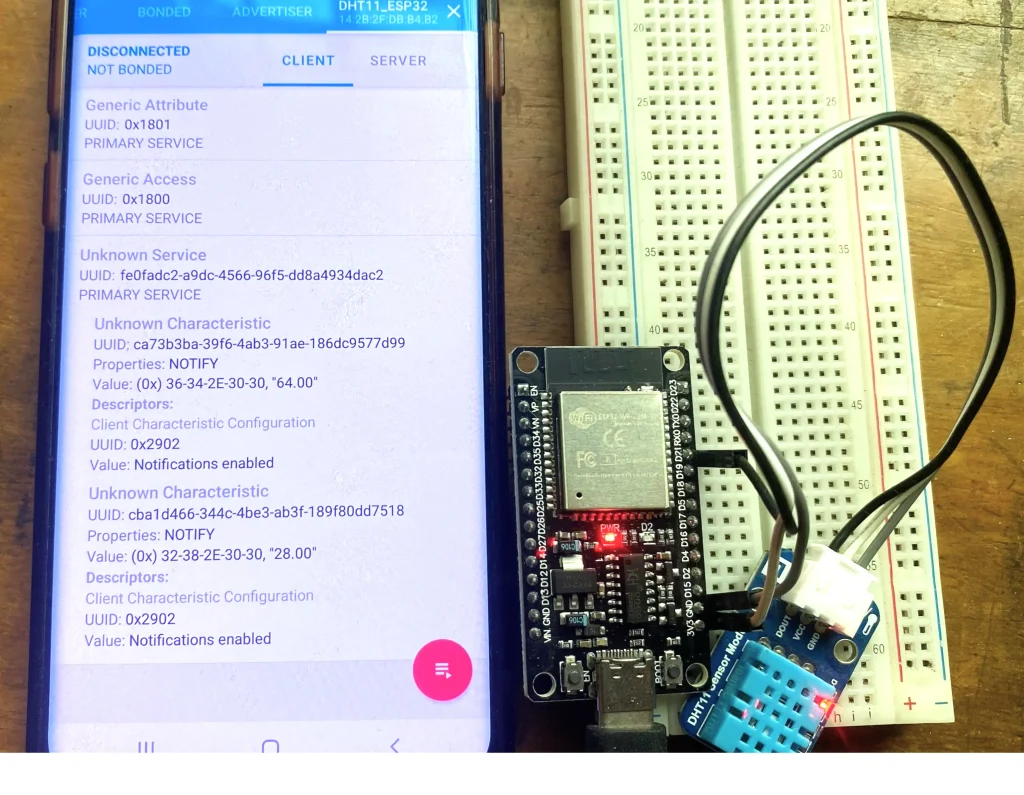
Next, you can verify if the BLE server is functioning correctly by using a BLE scanning app on your smartphone, such as nRF Connect, available for both Android and iOS.
After installing the application, enable Bluetooth on your smartphone. Open the nRF Connect app and click the Scan button. It will detect all nearby Bluetooth devices, including your DHT11_ESP32 device (which is the BLE server name defined in your code).
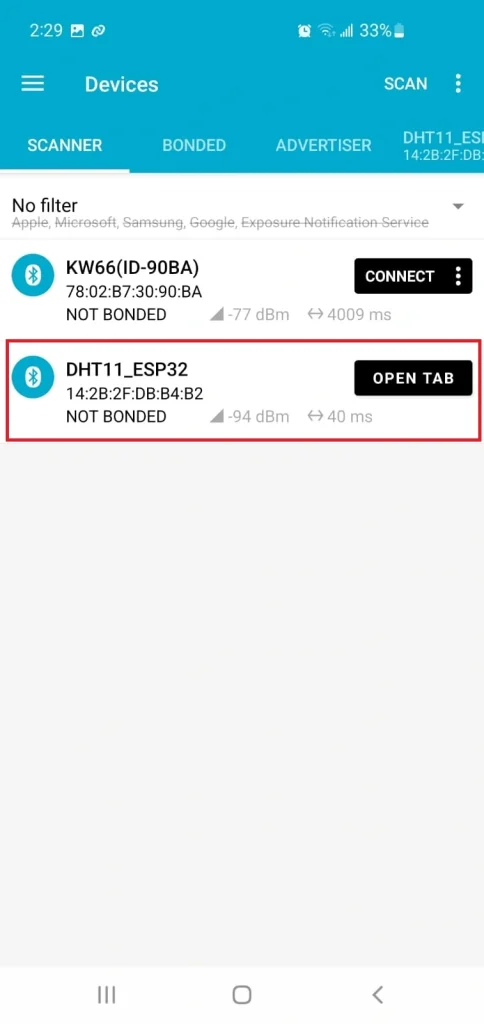
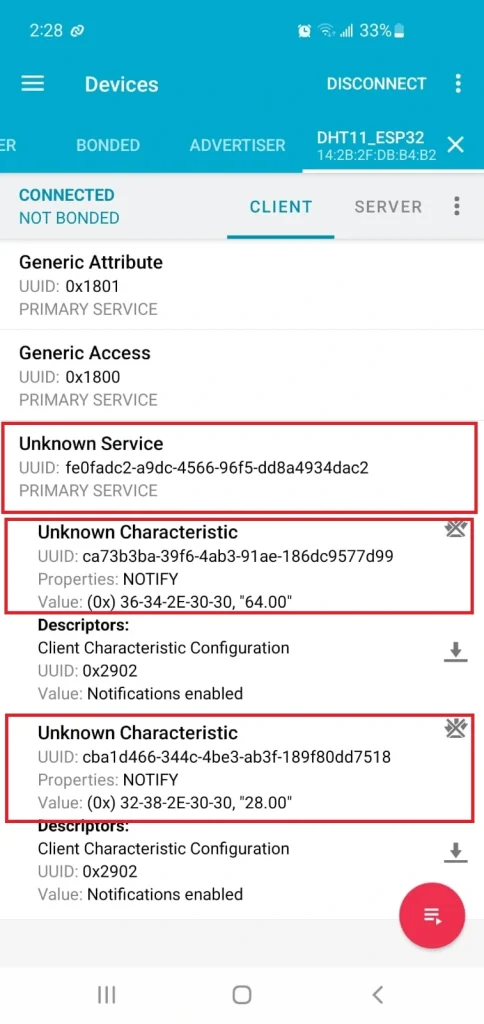
Connect to your DHT11_ESP32 device and navigate to the Client tab (the interface may vary slightly). You’ll see that it advertises the service with the UUID defined in the code, along with the temperature and humidity characteristics. Notice that these characteristics have the Notify property.
NOW, ESP32 BLE SERVER IS READY!
Proceed to the next section to create an ESP32 client that connects to the server, retrieves temperature and humidity data, and displays the readings on the Serial Monitor on Arduino IDE.
ESP32 BLE CLIENT
In this section, we’ll create the ESP32 BLE client that will establish a connection with the ESP32 BLE server and display the readings on the Serial Monitor of the Arduino IDE instead of an OLED display.
Schematic
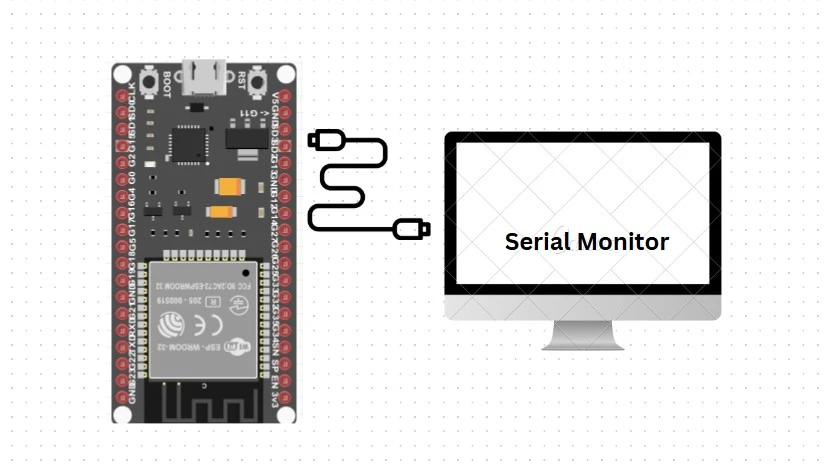
The ESP32 BLE client is connected to a personal computer via USB. The readings received via Bluetooth will be displayed on the Serial Monitor of the Arduino IDE.
ESP32 BLE Client – Code
Copy the BLE client sketch to your Arduino IDE
#include <BLEDevice.h>
#include <BLERemoteCharacteristic.h>
#include <BLEUtils.h>
#include <BLEScan.h>
#include <BLEAdvertisedDevice.h>

#define SERVICE_UUID        "fe0fadc2-a9dc-4566-96f5-dd8a4934dac2"
#define TEMP_CHAR_UUID      "cba1d466-344c-4be3-ab3f-189f80dd7518"
#define HUM_CHAR_UUID       "ca73b3ba-39f6-4ab3-91ae-186dc9577d99"

// Global variables
BLEAdvertisedDevice* myDevice = nullptr;
bool doConnect = false;
bool connected = false;
BLERemoteCharacteristic* tempRemoteChar = nullptr;
BLERemoteCharacteristic* humRemoteChar = nullptr;

// Callback for handling notifications
void tempNotifyCallback(BLERemoteCharacteristic* pChar, uint8_t* pData, size_t length, bool isNotify) {
  String value = "";
  for (int i = 0; i < length; i++) {
    value += (char)pData[i];
  }
  if (pChar->getUUID().toString() == TEMP_CHAR_UUID) {
    Serial.print("Temperature: ");
    Serial.print(value);
    Serial.println(" °C");
  }
}

void humNotifyCallback(BLERemoteCharacteristic* pChar, uint8_t* pData, size_t length, bool isNotify) {
  String value = "";
  for (int i = 0; i < length; i++) {
    value += (char)pData[i];
  }
  if (pChar->getUUID().toString() == HUM_CHAR_UUID) {
    Serial.print("Humidity: ");
    Serial.print(value);
    Serial.println(" %");
  }
}

// Callback for discovering BLE devices
class MyAdvertisedDeviceCallbacks: public BLEAdvertisedDeviceCallbacks {
  void onResult(BLEAdvertisedDevice advertisedDevice) {
    if (advertisedDevice.getName() == "DHT11_ESP32") {
      BLEDevice::getScan()->stop();
      if (myDevice != nullptr) delete myDevice; // Clean up old device if any
      myDevice = new BLEAdvertisedDevice(advertisedDevice);  // Dynamically allocate new device
      doConnect = true;
    }
  }
};

// Function to connect to the BLE server
bool connectToServer() {
  BLEClient* pClient = BLEDevice::createClient();
  Serial.println("Connecting to server...");

  if (!pClient->connect(myDevice)) {
    Serial.println("Connection failed");
    return false;
  }

  // Get the service
  BLERemoteService* pRemoteService = pClient->getService(SERVICE_UUID);
  if (pRemoteService == nullptr) {
    Serial.println("Service not found");
    pClient->disconnect();
    return false;
  }

  // Get the characteristics
  tempRemoteChar = pRemoteService->getCharacteristic(TEMP_CHAR_UUID);
  humRemoteChar = pRemoteService->getCharacteristic(HUM_CHAR_UUID);

  if (tempRemoteChar == nullptr || humRemoteChar == nullptr) {
    Serial.println("Characteristics not found");
    pClient->disconnect();
    return false;
  }

  // Enable notifications (write descriptor after registering)
  uint8_t enableNotify[] = {0x01, 0x00};

  tempRemoteChar->registerForNotify(tempNotifyCallback);
  tempRemoteChar->getDescriptor(BLEUUID((uint16_t)0x2902))->writeValue(enableNotify, 2, true);

  humRemoteChar->registerForNotify(humNotifyCallback);
  humRemoteChar->getDescriptor(BLEUUID((uint16_t)0x2902))->writeValue(enableNotify, 2, true);

  connected = true;
  return true;
}

void setup() {
  Serial.begin(115200);
  Serial.println("Starting BLE Client...");

  // Initialize BLE
  BLEDevice::init("");

  // Start scanning for devices
  BLEScan* pScan = BLEDevice::getScan();
  pScan->setAdvertisedDeviceCallbacks(new MyAdvertisedDeviceCallbacks());
  pScan->setActiveScan(true);
  pScan->start(30); // Scan for 30 seconds
}

void loop() {
  if (doConnect) {
    if (connectToServer()) {
      Serial.println("Connected to server!");
    } else {
      Serial.println("Failed to connect");
    }
    doConnect = false;
  }

  if (connected) {
    // Maintain connection
    delay(1000);
  } else {
    // Restart scan if disconnected
    delay(2000);
    BLEDevice::getScan()->start(30);
  }
}
Explaining the code flow
Import Necessary Libraries
The required BLE libraries are included to enable communication between the ESP32 and the BLE server. These libraries handle BLE device scanning, connections, and data transmission.
#include <BLEDevice.h>
#include <BLERemoteCharacteristic.h>
#include <BLEUtils.h>
#include <BLEScan.h>
#include <BLEAdvertisedDevice.h>
BLEDevice.h, BLEUtils.h, BLEScan.h, BLEAdvertisedDevice.h – These libraries allow the ESP32 to function as a BLE client that can scan, connect, and interact with BLE servers.
BLERemoteCharacteristic.h – This library is used to work with characteristics on a remote BLE server.
Define UUIDs and Global Variables
Unique identifiers (UUIDs) for the BLE service, temperature, and humidity characteristics are defined. These UUIDs ensure that the client connects to the correct server and retrieves the right data. Additionally, global variables are declared to track the connection status and store discovered devices.
#define SERVICE_UUID        "fe0fadc2-a9dc-4566-96f5-dd8a4934dac2"
#define TEMP_CHAR_UUID      "cba1d466-344c-4be3-ab3f-189f80dd7518"
#define HUM_CHAR_UUID       "ca73b3ba-39f6-4ab3-91ae-186dc9577d99"
SERVICE_UUID – Identifies the BLE service running on the server.
TEMP_CHAR_UUID & HUM_CHAR_UUID – Identify the temperature and humidity characteristics, respectively.
Global variables used
BLEAdvertisedDevice* myDevice = nullptr;
bool doConnect = false;
bool connected = false;
BLERemoteCharacteristic* tempRemoteChar = nullptr;
BLERemoteCharacteristic* humRemoteChar = nullptr;
myDevice holds the reference to the BLE device found during scanning. doConnect flags when a connection attempt should be made. connected tracks whether the client is currently connected. tempRemoteChar and humRemoteChar store pointers to the remote temperature and humidity characteristics.
Implement Callback Functions for Notifications
Two callback functions are defined to handle temperature and humidity notifications. When the server sends new data, these functions are triggered, process the received byte array, and print the temperature or humidity values to the Serial Monitor.
void tempNotifyCallback(BLERemoteCharacteristic* pChar, uint8_t* pData, size_t length, bool isNotify) {
  String value = "";
  for (int i = 0; i < length; i++) {
    value += (char)pData[i];
  }
  if (pChar->getUUID().toString() == TEMP_CHAR_UUID) {
    Serial.print("Temperature: ");
    Serial.print(value);
    Serial.println(" °C");
  }
}

void humNotifyCallback(BLERemoteCharacteristic* pChar, uint8_t* pData, size_t length, bool isNotify) {
  String value = "";
  for (int i = 0; i < length; i++) {
    value += (char)pData[i];
  }
  if (pChar->getUUID().toString() == HUM_CHAR_UUID) {
    Serial.print("Humidity: ");
    Serial.print(value);
    Serial.println(" %");
  }
}
These functions convert the incoming byte array (pData) into a human-readable string.They then check which characteristic sent the notification and print the corresponding temperature or humidity value to the Serial Monitor.
BLE Device Discovery Callback
A custom class, `MyAdvertisedDeviceCallbacks`, is created to process advertisement data from nearby BLE devices. When a device named ‘DHT11_ESP32’ is found, scanning stops, the device details are stored, and a flag is set to initiate a connection.
class MyAdvertisedDeviceCallbacks: public BLEAdvertisedDeviceCallbacks {
  void onResult(BLEAdvertisedDevice advertisedDevice) {
    if (advertisedDevice.getName() == "DHT11_ESP32") {
      BLEDevice::getScan()->stop();
      if (myDevice != nullptr) delete myDevice; // Clean up any old device
      myDevice = new BLEAdvertisedDevice(advertisedDevice);
      doConnect = true;
    }
  }
};
When a BLE device with the name “DHT11_ESP32” is found, the scan stops.The device’s information is stored, and the flag doConnect is set, indicating that the client should now try to connect.
Establish Connection with the BLE Server
The `connectToServer()` function is responsible for connecting to the BLE server. It retrieves the service and characteristics using their UUIDs. If successful, it enables notifications on both characteristics to receive real-time temperature and humidity updates.
bool connectToServer() {
  BLEClient* pClient = BLEDevice::createClient();
  Serial.println("Connecting to server...");

  if (!pClient->connect(myDevice)) {
    Serial.println("Connection failed");
    return false;
  }

  // Get the service
  BLERemoteService* pRemoteService = pClient->getService(SERVICE_UUID);
  if (pRemoteService == nullptr) {
    Serial.println("Service not found");
    pClient->disconnect();
    return false;
  }

  // Get the characteristics
  tempRemoteChar = pRemoteService->getCharacteristic(TEMP_CHAR_UUID);
  humRemoteChar = pRemoteService->getCharacteristic(HUM_CHAR_UUID);

  if (tempRemoteChar == nullptr || humRemoteChar == nullptr) {
    Serial.println("Characteristics not found");
    pClient->disconnect();
    return false;
  }

  // Enable notifications for both characteristics
  uint8_t enableNotify[] = {0x01, 0x00};
  tempRemoteChar->registerForNotify(tempNotifyCallback);
  tempRemoteChar->getDescriptor(BLEUUID((uint16_t)0x2902))->writeValue(enableNotify, 2, true);
  humRemoteChar->registerForNotify(humNotifyCallback);
  humRemoteChar->getDescriptor(BLEUUID((uint16_t)0x2902))->writeValue(enableNotify, 2, true);

  connected = true;
  return true;
}
A BLE client is created and attempts to connect to the discovered server.Once connected, the function retrieves the BLE service and its characteristics. It then registers notification callbacks for the temperature and humidity characteristics and writes the descriptor to enable notifications.
If everything is successful, it sets connected to true.
Setup Function
In the `setup()` function, serial communication is initiated, and BLE is initialized. The ESP32 starts scanning for BLE devices and listens for advertisement packets. When the target device is found, the connection process begins.
void setup() {
  Serial.begin(115200);
  Serial.println("Starting BLE Client...");

  // Initialize BLE
  BLEDevice::init("");

  // Start scanning for devices
  BLEScan* pScan = BLEDevice::getScan();
  pScan->setAdvertisedDeviceCallbacks(new MyAdvertisedDeviceCallbacks());
  pScan->setActiveScan(true);
  pScan->start(30); // Scan for 30 seconds
}
Serial.begin(115200) initializes serial communication for debugging. BLEDevice::init(“”) initializes the BLE stack.The BLE scanner is configured to use our custom callback class and to actively scan for 30 seconds.
Loop Function
The `loop()` function continuously checks the connection status. If the device is found, it connects to the server and retrieves data. If the connection is lost, scanning restarts every two seconds to reconnect.
void loop() {
  if (doConnect) {
    if (connectToServer()) {
      Serial.println("Connected to server!");
    } else {
      Serial.println("Failed to connect");
    }
    doConnect = false;
  }

  if (connected) {
    // Maintain connection
    delay(1000);
  } else {
    // Restart scan if disconnected
    delay(2000);
    BLEDevice::getScan()->start(30);
  }
}
Connection Attempt: If doConnect is set (i.e., a suitable device was found), it calls connectToServer().
- A successful connection prints “Connected to server!” to the Serial Monitor.
- If the connection fails, it prints “Failed to connect”.
Maintaining the Connection: If already connected, the code simply waits (using a 1-second delay) before checking again.
Restarting the Scan: If not connected, the scanner is restarted every 2 seconds to look for the server again.
Project Testing
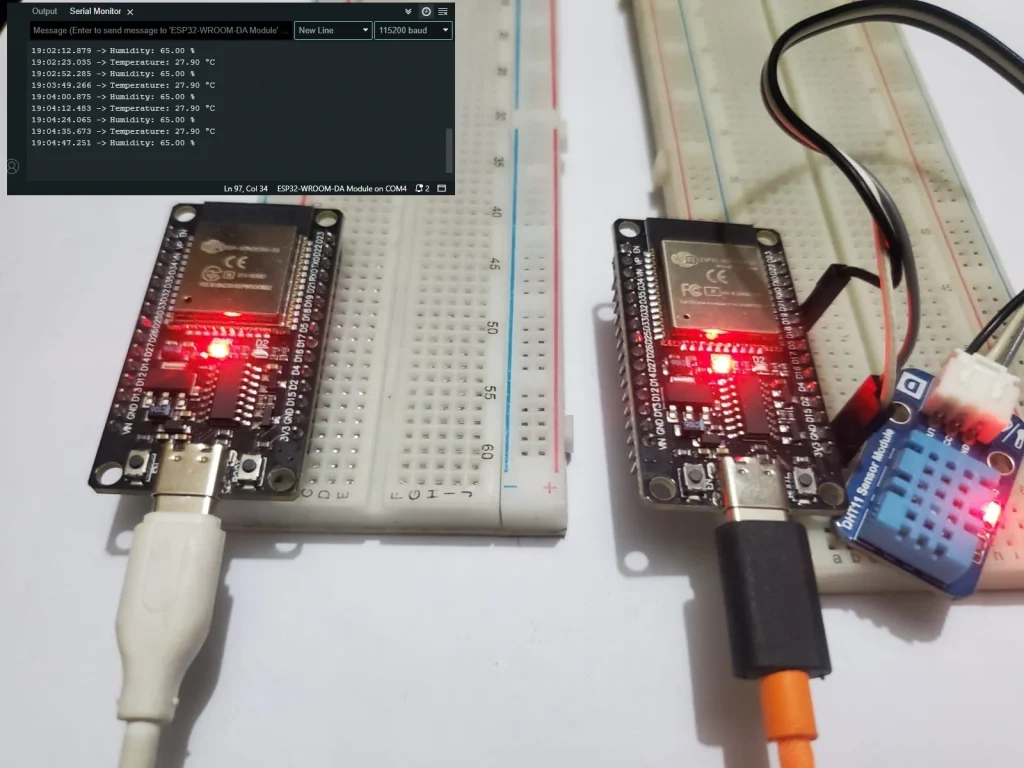
Important: Make sure to disconnect your smartphone from the BLE server; otherwise, the ESP32 BLE client will be unable to establish a connection with the server.
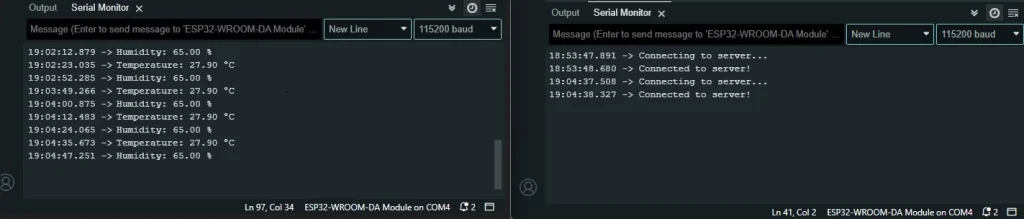
Conclusion
In this tutorial, you learned how to set up a BLE server and client with the ESP32 to transmit temperature and humidity data. The BLE client reads the updated values from the server and gets notified of any changes. BLE provides an alternative communication method to Wi-Fi for ESP32 boards