
In the era of the Internet of Things (IoT), connecting devices and collecting data has become more accessible and vital than ever before. LoRaWAN (Long Range Wide Area Network) technology has emerged as a powerful solution for long-range, low-power IoT communication. In this tutorial, we will build a LoRaWAN Gateway circuit using ESp32 and also, build a sensor node circuit using ESP32 and BME280 sensor. For both the circuit we will use SX1278 based (Ra-02) LoRa module for wireless communication between the devices. We will also show you, how to transmit sensor data to the popular IoT platform, ThingSpeak.
Our other ESP32-related tutorials are:
- How to Interface ESP32 with SIM7600 4G LTE Module using Arduino IDE
- Esp32 LoRa tutorial using Arduino IDE with example code
- How to install ESP32 Board in Arduino IDE
- How to interface ESP32 with RS485 (Modbus) sensors with example code
- IoT Based Energy Monitoring System using ESP32 and Firebase
Understanding ESP32 and LoRaWAN
The ESP32 is a versatile microcontroller that has gained significant popularity in the field of embedded systems and IoT applications. With its dual core powerful processing capabilities, built-in Wi-Fi and Bluetooth connectivity, and a wide range of peripherals and I/Os, the ESP32 offers a comprehensive platform for developing various projects. It provides a flexible and cost-effective solution for building connected devices, enabling seamless communication, data processing, and control functionalities.
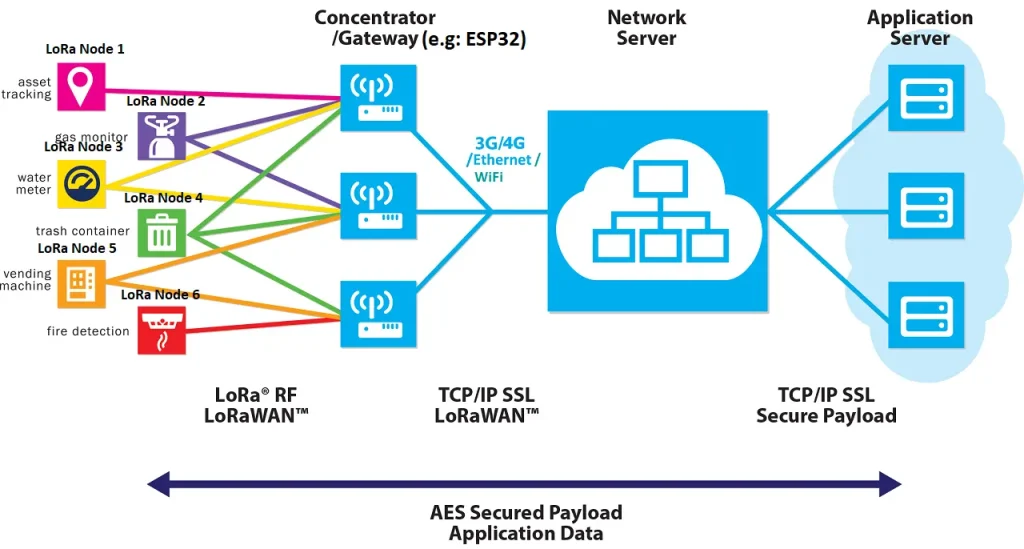
LoRaWAN (Long Range Wide Area Network) is a wireless communication protocol specifically designed for long-range, low-power IoT applications. It operates on unlicensed radio bands, allowing devices to transmit data over extended distances while consuming minimal energy. LoRaWAN utilizes a star network architecture, where low-power end devices communicate with gateway devices that serve as intermediaries between the devices and the network server.
This technology enables efficient and secure communication between IoT devices and cloud-based applications, making it suitable for a wide range of applications such as smart cities, agriculture, asset tracking, and environmental monitoring.
To know more about LoRa and LoRaWAN, please read our following article:
Regional Frequency Considerations for LoRa Modules
The LoRa modules suitable for different regions vary based on the regulatory frequency bands allocated for use. In Asia, the frequency band typically used for LoRa modules is 433MHz. For example, the SX1278 LoRa module is widely used in Asia, supporting the 433MHz frequency band.
In North America, the LoRa modules operate in the 915MHz frequency band. An example module for this region is the RFM95W, which operates on the 915MHz frequency band and is compliant with North American regulations. You can buy it from Amazon
In Europe, LoRa modules typically operate in the 868MHz frequency band. One example is the REYAX RYLR896 Lora Module, which is commonly used in Europe and supports the 868MHz frequency band.
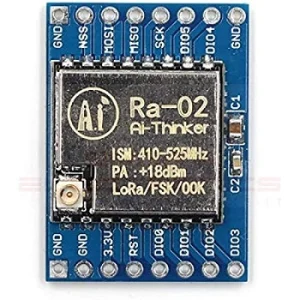
As we are from Asia, SX1278 Ra-02 module is suitable for us and we will use the module in our project. The SX1278 Ra-02 module is a low-cost, low-power, long-range transceiver module based on the LoRa technology. It operates in the 433MHz frequency band and can transmit up to 10 km of data in open spaces. The module includes an SPI interface for communication with microcontrollers like Arduino, Esp32, or Stm32.
ESP32 LoRaWAN Gateway with Sensor Node: The Project
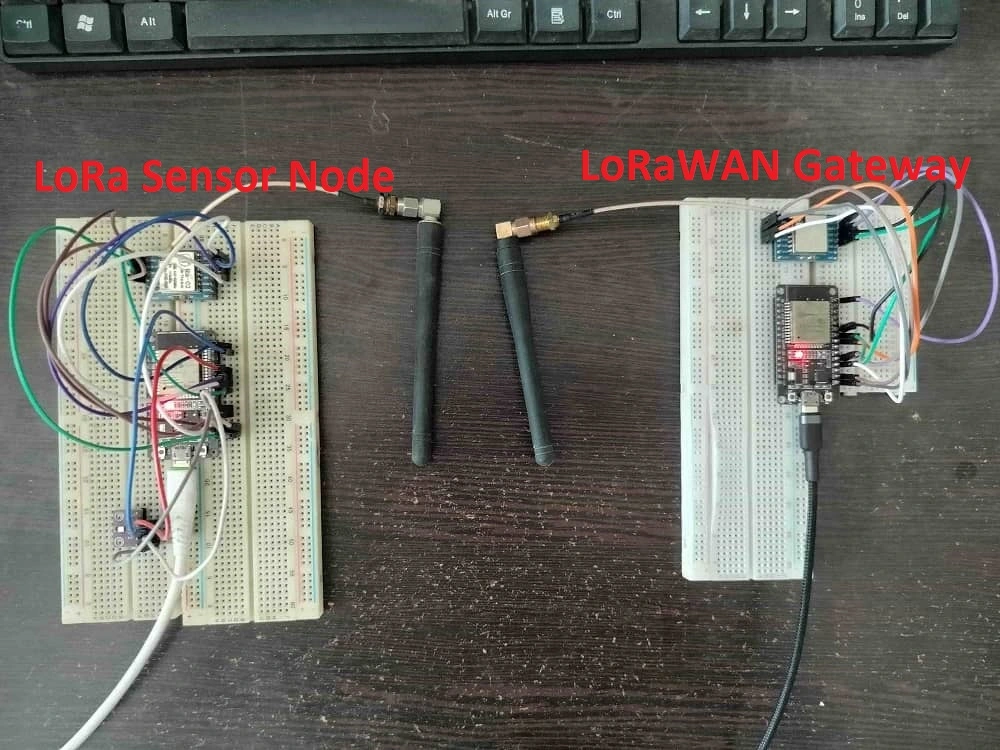
In this section of the tutorial, we will build a real-world LoRaWAN project by using LoRa and ESP32. We will send the sensor data from the LoRa node to LoRaWAN using LoRa wireless protocol and the LoRaWAN circuit will transmit the data to the ThingSpeak server using WiFi. let’s build the project,
Component List for the Project
| Component Name | Quantity | Purchase Link |
|---|---|---|
| ESP32 Development Board | 2 | Amazon |
| LoRa Module | 2 | Amazon |
| BME280 | 1 | Amazon |
| Breadboard | 2 | Amazon |
| Jumper wire Pack | 1 | Amazon |
Affiliate Disclosure: When you click on links to make a purchase, this can result in this website earning a commission. Affiliate programs and affiliations include, but are not limited to Amazon.com
Setting up the ESP32 LoRaWAN Gateway Circuit
To create a LoRaWAN gateway, we need an ESP32 development board and a LoRa transceiver module (we are using SX1278 (Ra-02) module). The ESP32 is responsible for receiving LoRaWAN packets from sensor nodes and forwarding them to the LoRaWAN network server like thingspeak. Setting up the gateway involves configuring the LoRa module, connecting it to the ESP32, and programming the ESP32 with the appropriate firmware.
Circuit Diagram of LoRaWAN Gateway
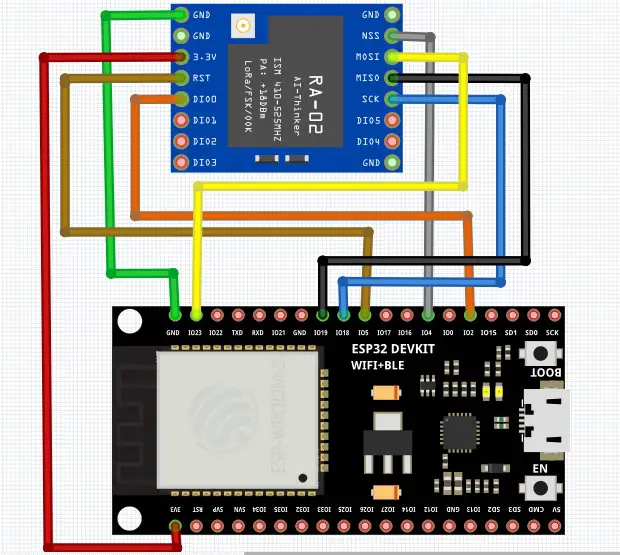
LoRaWAN Gateway Circuit Connection
| Esp32 Dev. Board | Lora sx1278 (Ra-02) |
|---|---|
| 3.3V | VCC |
| Ground | Gnd |
| GPIO 23 | MOSI |
| GPIO 19 | MISO |
| GPIO 18 | SCLK |
| GPIO 4 | NSS |
| GPIO 5 | RST |
| GPIO 2 | DIO0 |
Setting up the Sensor Node Circuit
The BME280 sensor is a versatile environmental sensor capable of measuring temperature, humidity, and barometric pressure. To create the sensor node, we integrate the BME280 sensor with an ESP32. The sensor node is programmed to collect data from the BME280 sensor and transmit it to the gateway using LoRaWAN technology.
Circuit Diagram of LoRa Sensor Node
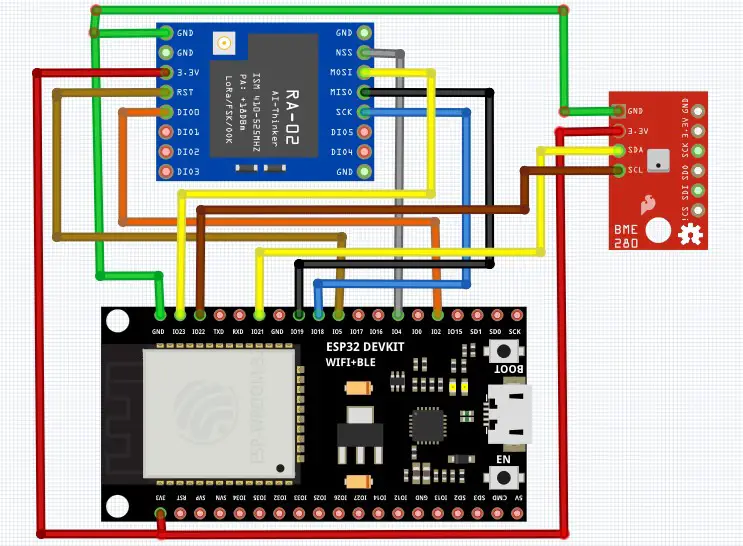
LoRaWAN Sensor Node Circuit Connection
| Esp32 Dev. Board | Lora sx1278 (Ra-02) | BME280 |
|---|---|---|
| 3.3V | VCC | VCC |
| Ground | Gnd | Gnd |
| GPIO 23 | MOSI | |
| GPIO 19 | MISO | |
| GPIO 18 | SCLK | |
| GPIO 4 | NSS | |
| GPIO 5 | RST | |
| GPIO 2 | DIO0 | |
| GPIO 21 | SDA | |
| GPIO 22 | SCL |
Integrating with ThingSpeak
ThingSpeak is a widely-used IoT platform that enables users to collect, analyze, and visualize sensor data in real-time. To integrate the ESP32 LoRaWAN gateway with ThingSpeak, we need to create a ThingSpeak account and set up a channel to receive the sensor data. ThingSpeak provides an API that allows us to send HTTP requests to update the channel with the received sensor data. There are some steps you need to follow to configure ThinkSpeak:
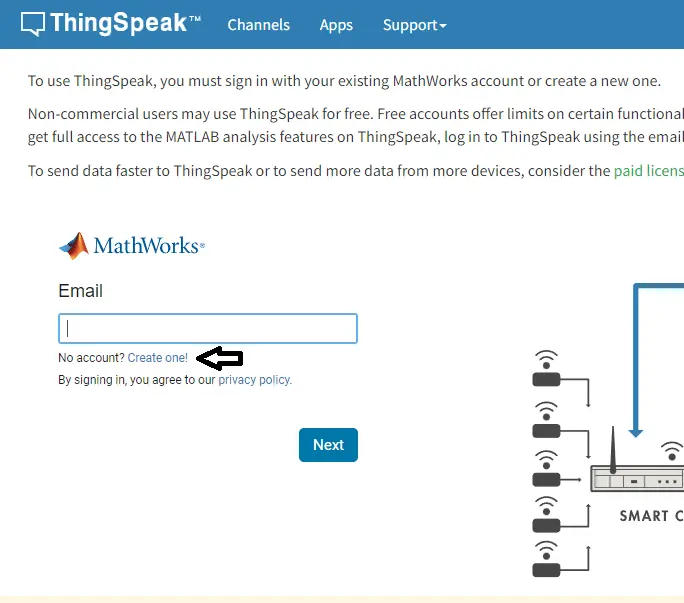
Step 1: Create an account at ThinkSpeak. For this go to thingspeak and create an account.
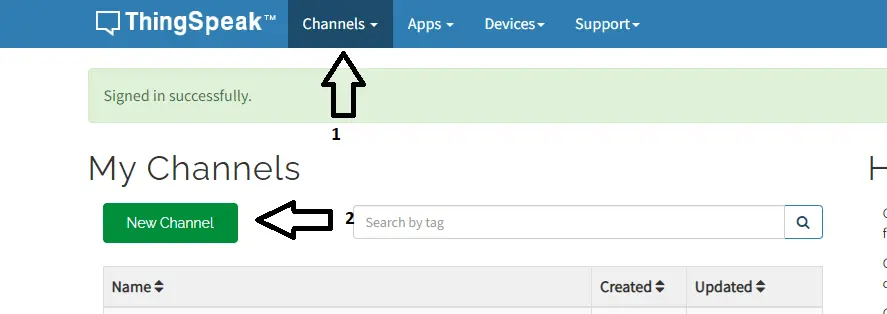
Step 2: Then click on Channels and create a new channel.
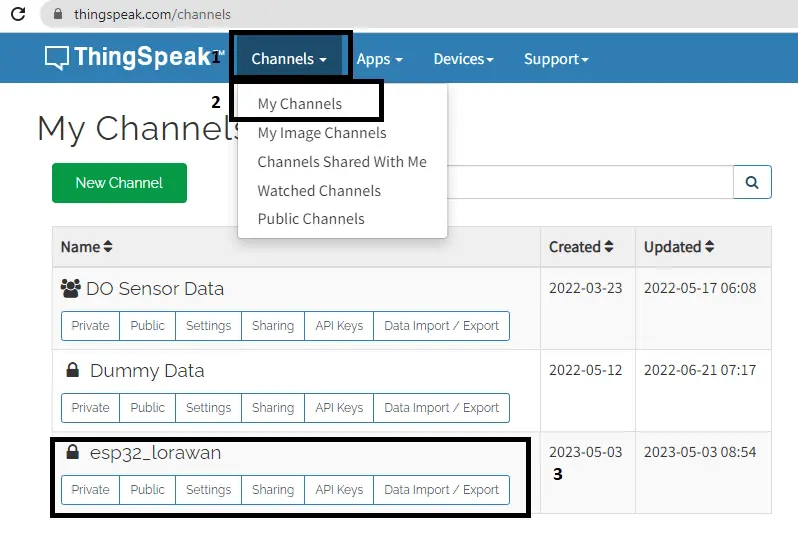
Step 3: After creating a channel, Click Channels > My Channels and select your Channel Name
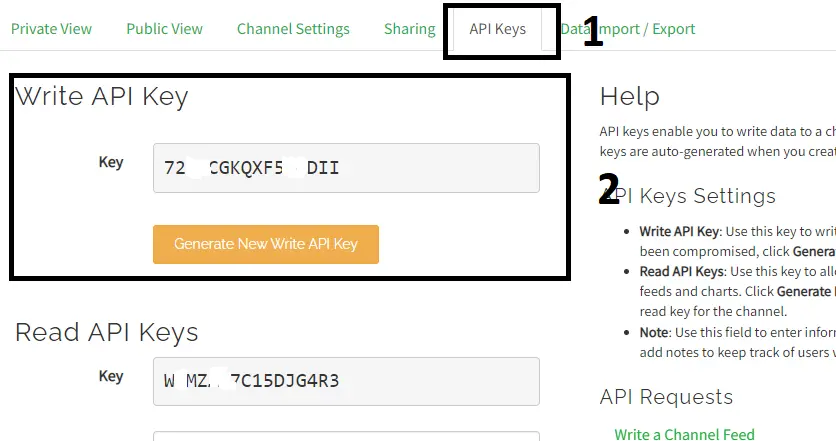
Step 4: After Step 3, Click on Channels > My Channels > API Keys and copy the Write API Key and paste it to your LoRaWAN code in Arduino IDE.
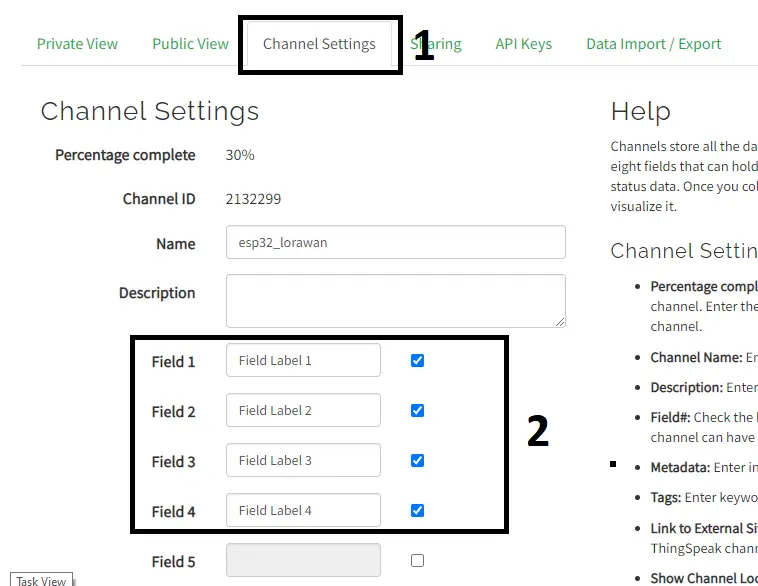
Step 5: After Step 4, Click on Channels > My Channels > Channel Settings and select how many fields you want to show on your dashboard.
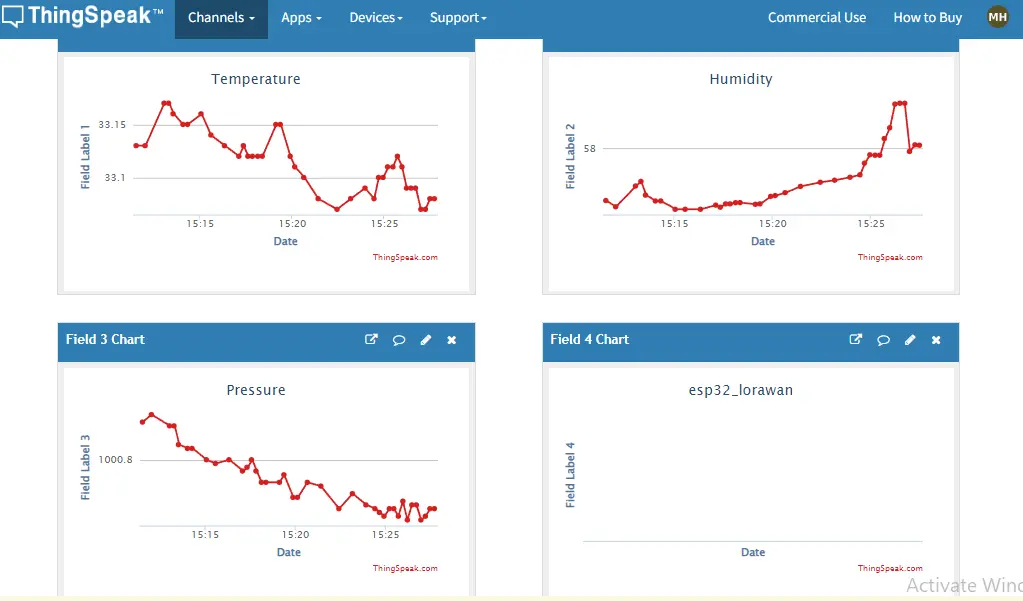
Step 6: If all the steps are complete, then Click on Private View Tab on ThingSpeak Dashboard and you will see this kind of interface. Where sensor data is continuously received by the ThingSpeak server from our ESP32 LoRaWAN device if your device is connected.
Developing the Gateway and Sensor Node Firmware
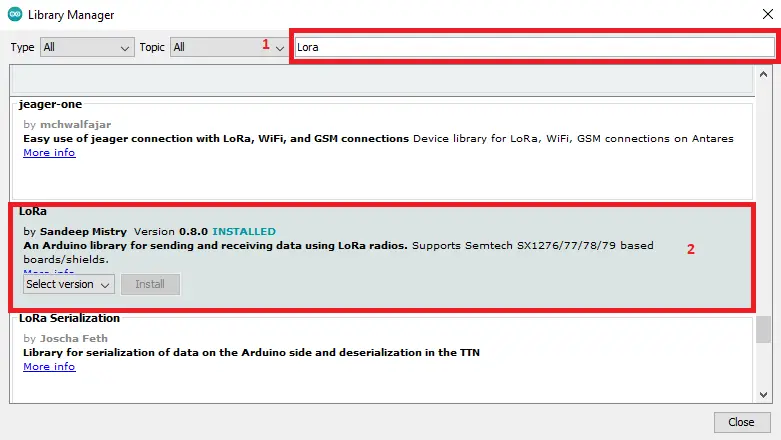
On the gateway side, we program the ESP32 with LoRa using a library called LoRa by Sandeep Mistry, also use ESP32 built-in WiFi library for Arduino IDE, the WiFi library handles the forwarding of LoRaWAN packets to the network server. Additionally, we integrate the ThingSpeak API to send the received data to the appropriate ThingSpeak channel.
Here is the LoRa Library which will use in the project:
LoRaWAN Gateway Code
.ino file for Arduino IDE
#include <WiFi.h> //WiFi Library for esp32
#include <LoRa.h> //LoRa Library

// Enter your Write API key from ThingSpeak
// go to ThingSpeak and click channels > API Keys
// and copy the Write API key
String api_key = "72MCYGKPXF5VDDIL";
// replace with your wifi ssid
const char *ssid = "wifi_ssid";
// replace with your wifi password
const char *password = "wifi_password";
// ThinkSpeak Server Address
const char* server = "api.thingspeak.com";

WiFiClient client; //Initialize WiFi as client

//define the pins used by the transceiver module
#define NSS 4
#define RST 5
#define DI0 2

String temp; // This string hold the temperature data
String pressure; // This string hold the presser data
String humidity; // This string hold the humidity data

// This string receive the Lora data
// which is comming from sensor node
String lora_data = "";

// these variables are used to identify the position
// of the sensor data from the string
int pos_1, pos_2;

void setup() {
  Serial.begin(115200);

  //setup LoRa sender
  LoRa.setPins(NSS, RST, DI0);

  //replace the LoRa.begin(frequency) argument with your location's frequency
  //433E6 for Asia
  //866E6 for Europe
  //915E6 for North America
  while (!LoRa.begin(433E6)) {
    Serial.println(".");
    delay(500);
  }

 Serial.println("LoRa init succeeded.");

  // Change sync word (0xF0) to match the receiver
 // The sync word assures that to not get LoRa messages from other LoRa transceivers
 // ranges from 0-0xFF
 LoRa.setSyncWord(0xF0);

 // Connect to Wi-Fi network with SSID and password
  Serial.print("Connecting to WiFi ");
  Serial.println(ssid);
  WiFi.begin(ssid, password);
  while (WiFi.status() != WL_CONNECTED) {
    delay(1000);
    Serial.print(".");
  }
  // Print local IP address and start the web server
  Serial.println("");
  Serial.println("WiFi connected.");
  Serial.println("IP address: ");
  Serial.println(WiFi.localIP());
}


void loop() {
  // try to parse packet
  int packetSize = LoRa.parsePacket();
  if (packetSize)
  {
    // received a packet from lora node
    Serial.print("Received packet:  ");
    String lora_data = LoRa.readString();
    Serial.print(lora_data);
    // read packet
    while (LoRa.available()) {
      Serial.print((char)LoRa.read());
    }
    // print RSSI of packet
    Serial.print("' with RSSI ");
    Serial.println(LoRa.packetRssi());

    pos_1 = lora_data.indexOf('a');
    pos_2 = lora_data.indexOf('b');

    temp = lora_data.substring(0, pos_1);
    pressure = lora_data.substring(pos_1 + 1, pos_2);
    humidity = lora_data.substring(pos_2 + 1, lora_data.length());

    Serial.print("Temperature: ");
    Serial.println(temp);
    Serial.print("Pressure: ");
    Serial.println(pressure);
    Serial.print("Humidity: ");
    Serial.println(humidity);
  }

  //send data to thingspeak server
  if (client.connect(server, 80)) // "184.106.153.149" or api.thingspeak.com
   {
      String str_data = api_key;
      str_data += "&field1=";
      str_data += String(temp);
      str_data += "&field2=";
      str_data += String(humidity);
      str_data += "&field3=";
      str_data += String(pressure);
      str_data += "\r\n\r\n\r\n\r\n";

      client.print("POST /update HTTP/1.1\n");
      client.print("Host: api.thingspeak.com\n");
      client.print("Connection: close\n");
      client.print("X-THINGSPEAKAPIKEY: " + api_key + "\n");
      client.print("Content-Type: application/x-www-form-urlencoded\n");
      client.print("Content-Length: ");
      client.print(str_data.length());
      client.print("\n\n");
      client.print(str_data);

    }

  delay(1000);

}
On the sensor node side, we program the microcontroller (ESP32) to collect data from the BME280 sensor and transmit it to the gateway circuit using LoRa communication. We will use Adafruit Unified Sensor and Adafruit BME280 library to configure the BME280 sensor which measures pressure, temperature, and humidity data from the environment.
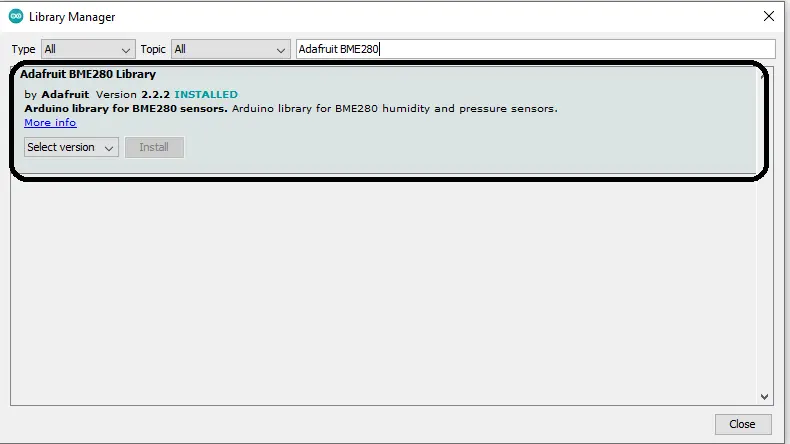
Here is the Adafruit Libraries for BME280 sensor which will use in the project:
Go to Tools > Manage Libraries and search for “Adafruit Unified Sensor Library” then install the library.
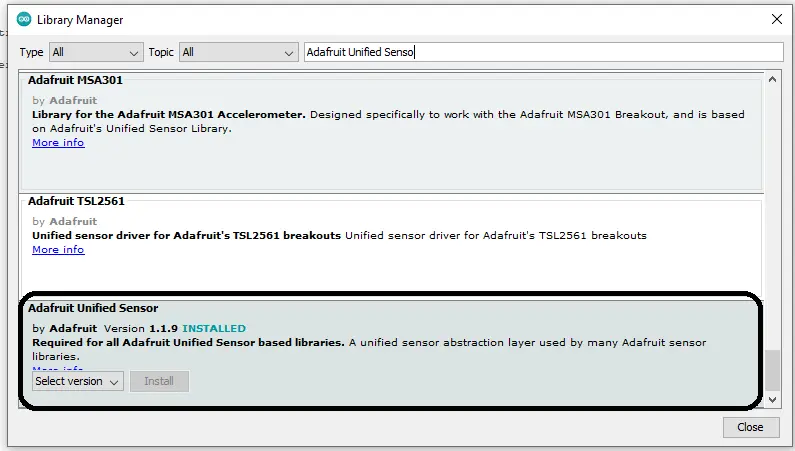
Again search for “Adafruit BME280” and install the library.
LoRa Sensor node Code
.ino file for Arduino IDE
#include <Wire.h> //WiFi Library for esp32
#include <Adafruit_Sensor.h> //Adafruit Unified Sensor library
#include <Adafruit_BME280.h> //Adafruit Adafruit BME280 library
#include <LoRa.h> //LoRa Library

//define the pins used by the LoRa module
#define NSS 4
#define RST 5
#define DI0 2

Adafruit_BME280 bme; // I2C

//this structure type for store the sensor value
struct sensor{
  float read_temp;
  float read_pressure;
  float read_humidity;
};

//Initialize the structure type as bme280
struct sensor bme280;

// this string variable for sending the sensor data
// to gateway circuit using lora communication
String lora_message = "";

void setup() {
  Serial.begin(115200);

  //setup LoRa sender
  LoRa.setPins(NSS, RST, DI0);

  //replace the LoRa.begin(frequency) argument with your location's frequency
  //433E6 for Asia
  //866E6 for Europe
  //915E6 for North America
  while (!LoRa.begin(433E6)) {
    Serial.println(".");
    delay(500);
  }

 Serial.println("LoRa init succeeded.");

 // Change sync word (0xF0) to match the receiver
 // The sync word assures that to not get LoRa messages from other LoRa transceivers
 // ranges from 0-0xFF
 LoRa.setSyncWord(0xF0);

  Serial.println("Initialize BME280");

  bool status;

  //Initialize the bme280 sensor with its i2c address (0x76)
  status = bme.begin(0x76);
  if (!status) {
    Serial.println("Could not find a valid sensor..");
    while (1);
  }

  Serial.println("BME280 sensor Connection Sucessful!");
  Serial.println();
}


void loop() {
  // Read Temperature data from bme280
  bme280.read_temp = bme.readTemperature();
  Serial.print("Temperature = ");
  Serial.println(bme280.read_temp);
  // Read Pressure data from bme280
  bme280.read_pressure = bme.readPressure();
  bme280.read_pressure = bme280.read_pressure / 100.0F;
  Serial.print("Pressure = ");
  Serial.print(bme280.read_pressure);
  Serial.println(" hPa");
  // Read Humidity data from bme280
  bme280.read_humidity = bme.readHumidity();
  Serial.print("Humidity = ");
  Serial.print(bme280.read_humidity);
  Serial.println(" %");

  // convert the 3 data to string and concatenate the string
  // we use "a" and "b" as string between sensor data to properly
  // search the substring and collect the sensor data in gateway side
  lora_message = String(bme280.read_temp) + "a" + String(bme280.read_pressure) + "b" + String(bme280.read_humidity);
  Serial.println(lora_message);

   // send the LoRa packet
  LoRa.beginPacket();
  LoRa.print(lora_message);
  LoRa.endPacket();
  delay(1000);


}
Testing and Deployment
Once the gateway and sensor node firmware are ready, we can deploy the system and start collecting sensor data. Verify that the gateway is properly receiving LoRaWAN packets from the sensor node and forwarding them to the network server. Check the ThingSpeak channel to ensure that the data is being updated correctly.
