
In this tutorial, we will show how to create an stm32 microcontroller project in stm32cubeide. We also write an example code for STM32 Nucleo Board by using the stm32 Hardware Abstraction Layer (HAL) API library. So, let’s get started.
Our other STM32 related tutorials are:
- Understanding STM32 HAL Library Fundamentals
- STM32 Timer tutorial using interrupt
- STM32 ADC Interfacing with HAL code example
- STM32 ADC tutorial using DMA with HAL Code Example
- Getting Started with FreeRTOS in STM32
- How to create a project in stm32CubeMX for Keil uvision Ide
- Stm32 Bluetooth module HC-05 interfacing with HAL code example
Component List for the Project
| Component Name | Quantity | Purchase Link |
|---|---|---|
| STM32 NUCLEO Development Board | 1 | Amazon |
| Breadboard | 1 | Amazon |
| Jumper wire pack | 1 | Amazon |
| USB Mini-B cable | 1 | Amazon |
Affiliate Disclosure: When you click on links to make a purchase, this can result in this website earning a commission. Affiliate programs and affiliations include, but are not limited to Amazon.com
Stm32CubeIDE Installation
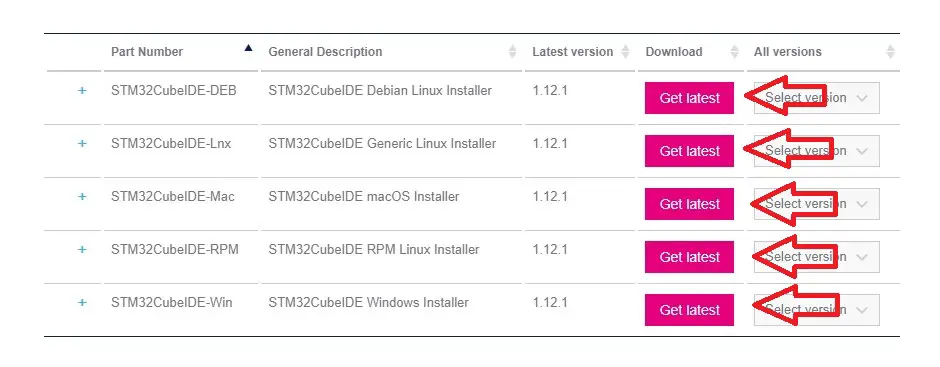
STMicroelectronics has its own development environment (IDE) for the ARM Cortex M0/M3/M4 series of microcontrollers called Stm32CubeIDE. You can download the IDE from their website and install it in your windows, MAC, or Linux machine.
Project creation in Stm32Cube IDE
Step 1: Open your STM32CubeIDE then go to File > New > STM32 project

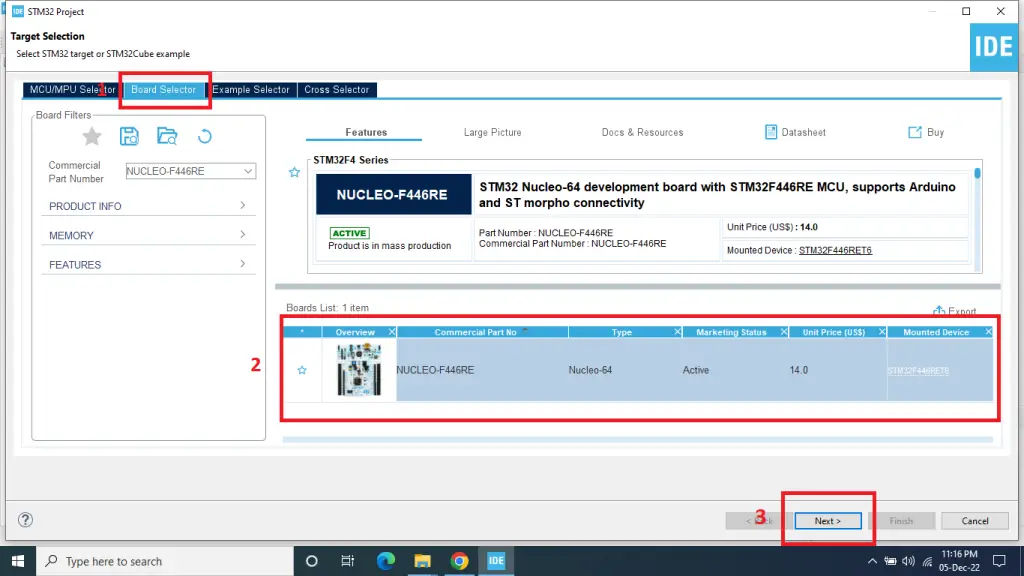
Step 2: Then click on Board Selector tab and search your selected development board or Microcontroller in the search bar. In our case, we select NUCLEO-F446RE development board and click Next.
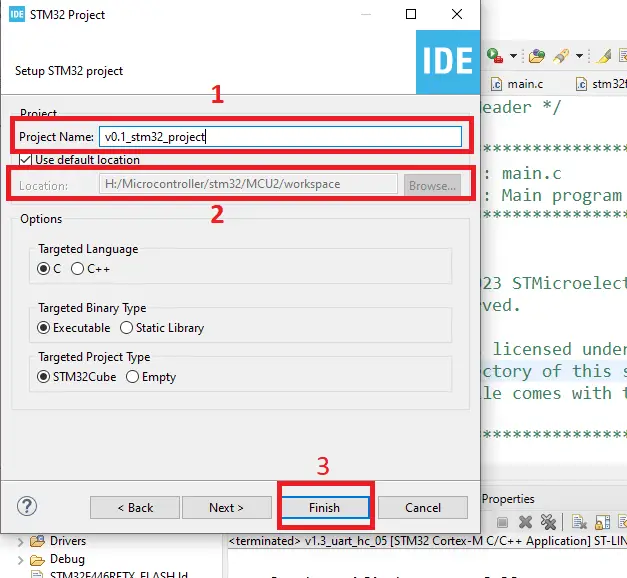
Step 3: Write the name of the project in Project Name field also Select your project location (workspace) and click Finish button. In our case, we select the default location.
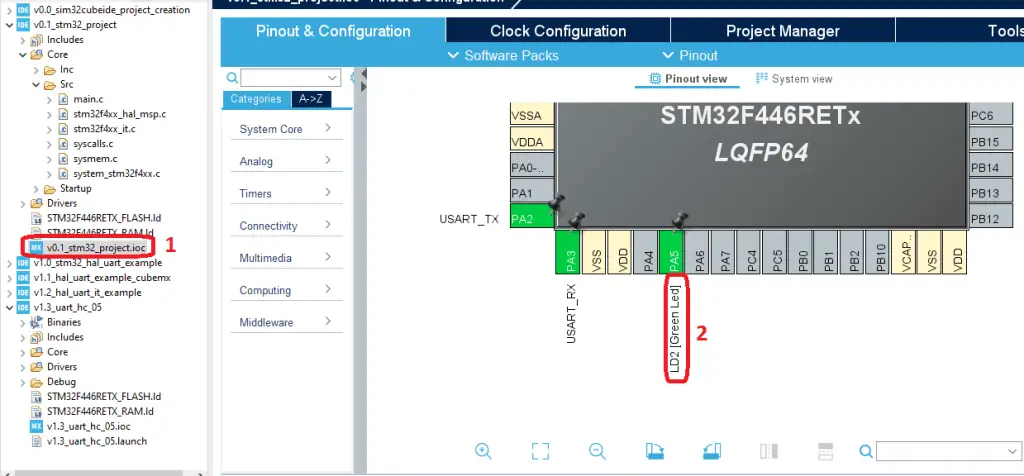
Step 4: If you want to view or edit your configuration settings double click to your project.ioc file and open the Device Configuration Tool of STM32CubeIDE. Change the configuration settings as your project needs. By default STM32Cube Ide add some default configuration settings in this tool like RCC Clock settings and UART peripheral configurations, if you select any STM32 development board for your project.
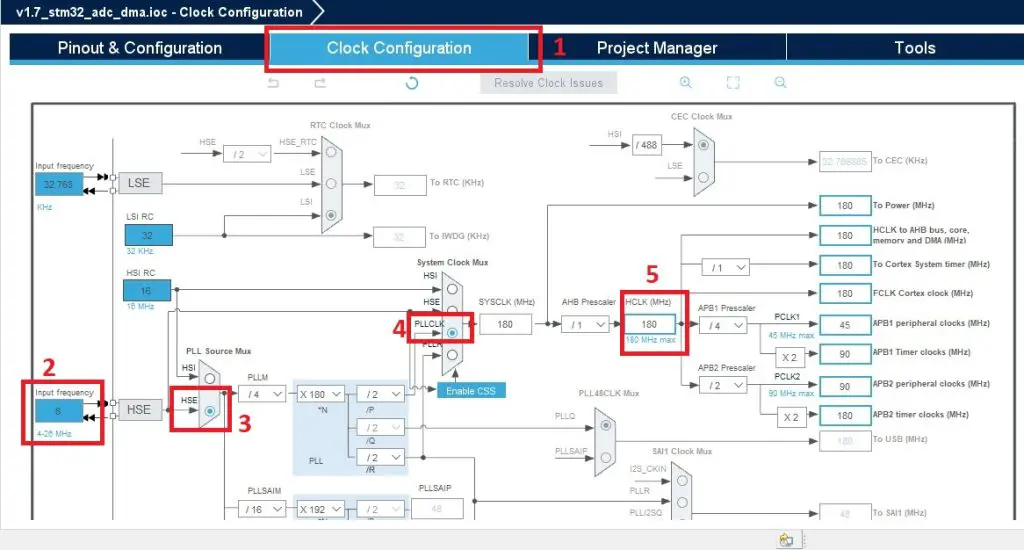
Step 5: If you want to change the clock speed of your STM32 Microcontroller, click on Clock Configuration tab and select the clock source HSI (High Speed Internal) or HSE (High Speed External). Our STM32F446RE MCU has 16 MHz Internal clock (HSI) also, the NUCLEO-F446RE Development has 8 MHz external oscillator as clock source.
You can stretch the clock capabilities of STM32F446RE Microcontroller up to 180 MHz by using PLL (PLL is a clock generation engine in the Microcontroller which is used to generate the clock speed and this is much higher than the internal Clock HSI or External Clock HSE).
We will use 8 MHz external clock because it gives more accurate clock pulses than Internal Clock (SHI) also, enable the PLL engine to configure the clock to 180 MHz.
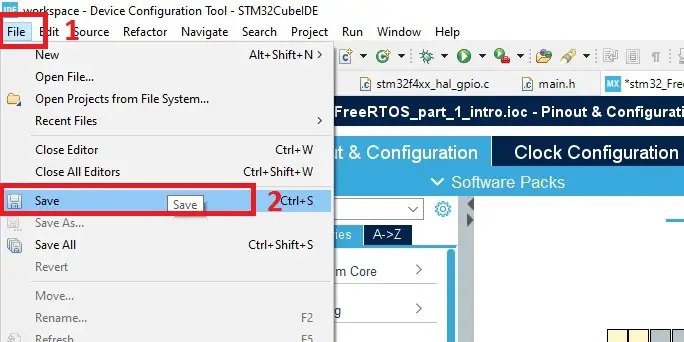
Step 6: After finish all the configurations, click on File > Save and Generate the code.
Step 7: After complete the code writing first build the project by clicking the build tool. If the project in successfully build then connect your STM32 microcontroller to your computer and click the RUN tool to download the project in your stm32 microcontroller.
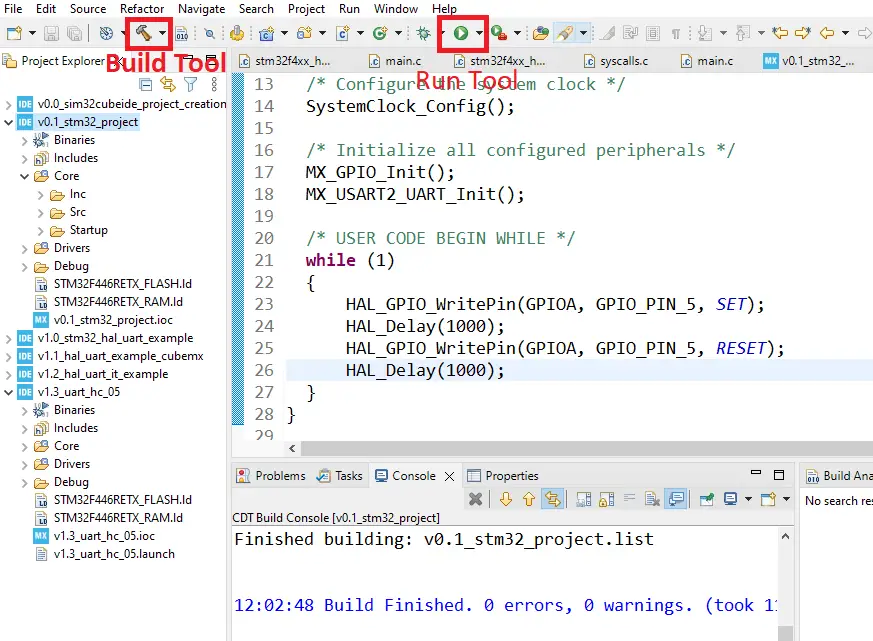
Example Code
This is the example code which we write for demonstration purpose. The code is just ON and OFF the user led of the NUCLEO board after 1 second and repeat the process in a while loop.
main.c file
#include "main.h"

UART_HandleTypeDef huart2;

void SystemClock_Config(void);
static void MX_GPIO_Init(void);
static void MX_USART2_UART_Init(void);

int main(void)
{
  HAL_Init();

  /* Configure the system clock */
  SystemClock_Config();

  /* Initialize all configured peripherals */
  MX_GPIO_Init();
  MX_USART2_UART_Init();

  /* USER CODE BEGIN WHILE */
  while (1)
  {
	  HAL_GPIO_WritePin(GPIOA, GPIO_PIN_5, SET); //LED ON
	  HAL_Delay(1000); //1 second delay
	  HAL_GPIO_WritePin(GPIOA, GPIO_PIN_5, RESET); //LED OFF
	  HAL_Delay(1000); //1 second delay
  }
}

/**
  * @brief System Clock Configuration
  * @retval None
  */
void SystemClock_Config(void)
{
  RCC_OscInitTypeDef RCC_OscInitStruct = {0};
  RCC_ClkInitTypeDef RCC_ClkInitStruct = {0};

  /** Configure the main internal regulator output voltage
  */
  __HAL_RCC_PWR_CLK_ENABLE();
  __HAL_PWR_VOLTAGESCALING_CONFIG(PWR_REGULATOR_VOLTAGE_SCALE3);

  /** Initializes the RCC Oscillators according to the specified parameters
  * in the RCC_OscInitTypeDef structure.
  */
  RCC_OscInitStruct.OscillatorType = RCC_OSCILLATORTYPE_HSI;
  RCC_OscInitStruct.HSIState = RCC_HSI_ON;
  RCC_OscInitStruct.HSICalibrationValue = RCC_HSICALIBRATION_DEFAULT;
  RCC_OscInitStruct.PLL.PLLState = RCC_PLL_ON;
  RCC_OscInitStruct.PLL.PLLSource = RCC_PLLSOURCE_HSI;
  RCC_OscInitStruct.PLL.PLLM = 16;
  RCC_OscInitStruct.PLL.PLLN = 336;
  RCC_OscInitStruct.PLL.PLLP = RCC_PLLP_DIV4;
  RCC_OscInitStruct.PLL.PLLQ = 2;
  RCC_OscInitStruct.PLL.PLLR = 2;
  if (HAL_RCC_OscConfig(&RCC_OscInitStruct) != HAL_OK)
  {
    Error_Handler();
  }

  /** Initializes the CPU, AHB and APB buses clocks
  */
  RCC_ClkInitStruct.ClockType = RCC_CLOCKTYPE_HCLK|RCC_CLOCKTYPE_SYSCLK
                              |RCC_CLOCKTYPE_PCLK1|RCC_CLOCKTYPE_PCLK2;
  RCC_ClkInitStruct.SYSCLKSource = RCC_SYSCLKSOURCE_PLLCLK;
  RCC_ClkInitStruct.AHBCLKDivider = RCC_SYSCLK_DIV1;
  RCC_ClkInitStruct.APB1CLKDivider = RCC_HCLK_DIV2;
  RCC_ClkInitStruct.APB2CLKDivider = RCC_HCLK_DIV1;

  if (HAL_RCC_ClockConfig(&RCC_ClkInitStruct, FLASH_LATENCY_2) != HAL_OK)
  {
    Error_Handler();
  }
}

/**
  * @brief USART2 Initialization Function
  * @param None
  * @retval None
  */
static void MX_USART2_UART_Init(void)
{
  huart2.Instance = USART2;
  huart2.Init.BaudRate = 115200;
  huart2.Init.WordLength = UART_WORDLENGTH_8B;
  huart2.Init.StopBits = UART_STOPBITS_1;
  huart2.Init.Parity = UART_PARITY_NONE;
  huart2.Init.Mode = UART_MODE_TX_RX;
  huart2.Init.HwFlowCtl = UART_HWCONTROL_NONE;
  huart2.Init.OverSampling = UART_OVERSAMPLING_16;
  if (HAL_UART_Init(&huart2) != HAL_OK)
  {
    Error_Handler();
  }

}

/**
  * @brief GPIO Initialization Function
  * @param None
  * @retval None
  */
static void MX_GPIO_Init(void)
{
  GPIO_InitTypeDef GPIO_InitStruct = {0};

  /* GPIO Ports Clock Enable */
  __HAL_RCC_GPIOC_CLK_ENABLE();
  __HAL_RCC_GPIOH_CLK_ENABLE();
  __HAL_RCC_GPIOA_CLK_ENABLE();
  __HAL_RCC_GPIOB_CLK_ENABLE();

  /*Configure GPIO pin Output Level */
  HAL_GPIO_WritePin(LD2_GPIO_Port, LD2_Pin, GPIO_PIN_RESET);

  /*Configure GPIO pin : B1_Pin */
  GPIO_InitStruct.Pin = B1_Pin;
  GPIO_InitStruct.Mode = GPIO_MODE_IT_FALLING;
  GPIO_InitStruct.Pull = GPIO_NOPULL;
  HAL_GPIO_Init(B1_GPIO_Port, &GPIO_InitStruct);

  /*Configure GPIO pin : LD2_Pin */
  GPIO_InitStruct.Pin = LD2_Pin;
  GPIO_InitStruct.Mode = GPIO_MODE_OUTPUT_PP;
  GPIO_InitStruct.Pull = GPIO_NOPULL;
  GPIO_InitStruct.Speed = GPIO_SPEED_FREQ_LOW;
  HAL_GPIO_Init(LD2_GPIO_Port, &GPIO_InitStruct);

}

/**
  * @brief  This function is executed in case of error occurrence.
  * @retval None
  */
void Error_Handler(void)
{
  /* USER CODE BEGIN Error_Handler_Debug */
  /* User can add his own implementation to report the HAL error return state */
  __disable_irq();
  while (1)
  {
  }
  /* USER CODE END Error_Handler_Debug */
}

#ifdef  USE_FULL_ASSERT
/**
  * @brief  Reports the name of the source file and the source line number
  *         where the assert_param error has occurred.
  * @param  file: pointer to the source file name
  * @param  line: assert_param error line source number
  * @retval None
  */
void assert_failed(uint8_t *file, uint32_t line)
{
  /* USER CODE BEGIN 6 */
  /* User can add his own implementation to report the file name and line number,
     ex: printf("Wrong parameters value: file %s on line %d\r\n", file, line) */
  /* USER CODE END 6 */
}
#endif /* USE_FULL_ASSERT */