
In this tutorial, we will interfacing HC-05 Bluetooth module by using UART peripheral of stm32 microcontroller. For this tutorial, we are using stm32 nucleo-f446re development board. We will discuss about HC-05 Bluetooth module, its features and pin description. After that we will create a simple project which will turn ON-OFF a LED by using a Bluetooth Serial Terminal Android application. So, lets get started.
We have a full blog post in STM32 UART peripheral. Visit the below link, if you want to read more about UART peripheral.
STM32 UART / USART tutorial with HAL code example
Our other STM32 related tutorials are:
- STM32 ADC Interfacing with HAL code example
- Getting Started with FreeRTOS in STM32
- How to create a project in stm32CubeMX for Keil uvision Ide
- How to create stm32 project in stm32cubeide with example code
- Interfacing STM32 with I2C LCD : HAL example code included
Introduction to HC-05 Bluetooth module
The HC-05 is a widely used low-cost and low-power Bluetooth module that is integrated into a number of microcontroller-based projects. It provides wireless communication between two devices and supports both classic Bluetooth and Bluetooth Low Energy (BLE) communication modes. It can operate in both slave and master modes and is widely used with almost all microcontroller families like Arduino, PIC, or STM32 for Bluetooth communication between microcontroller boards and mobile devices such as smartphones or tablets.

HC-05 Bluetooth module features
- Bluetooth version: Bluetooth v2.0+EDR (Enhanced Data Rate)
- Frequency range: 2.4GHz ISM band
- Modulation method: GFSK (Gaussian Frequency Shift Keying)
- Operating voltage: 3.3V
- Operating temperature: -20°C to +70°C
- Transmission power: -30dBm to +4dBm
- Operating range: up to 50 meters (depending on the environment)
- UART interface: Supports both hardware and software serial
These specifications make the HC-05 a reliable, low-cost and low-power solution for a wide range of Bluetooth communication applications.
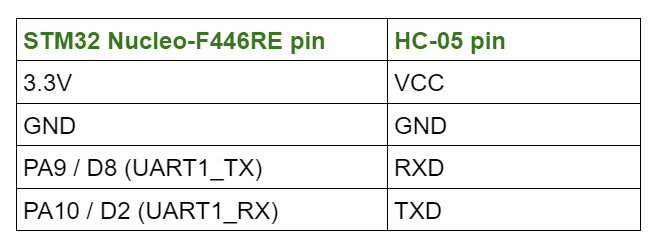
HC-05 pinout
The HC-05 Bluetooth module is a serial communication module that has a total of 6 pins. The pinout is as follows:
- VCC (power supply voltage: 3.3V)
- GND (ground)
- TXD (transmit data)
- RXD (receive data)
- STATE (indicates the status of the module)
- EN (enable/disable control pin)
Interfacing HC-05 Bluetooth module with stm32 – example project
In this section of the tutorial, we are creating a project that is ON-OFF a LED by using a smartphone via Bluetooth. To control the LED we will use an Andriod App called Serial Bluetooth Terminal.
Component List for the Project
[wptb id=938]
For troubleshooting, some extremely useful test equipment
[wptb id=890]
Affiliate Disclosure: When you click on links to make a purchase, this can result in this website earning a commission. Affiliate programs and affiliations include, but are not limited to Amazon.com
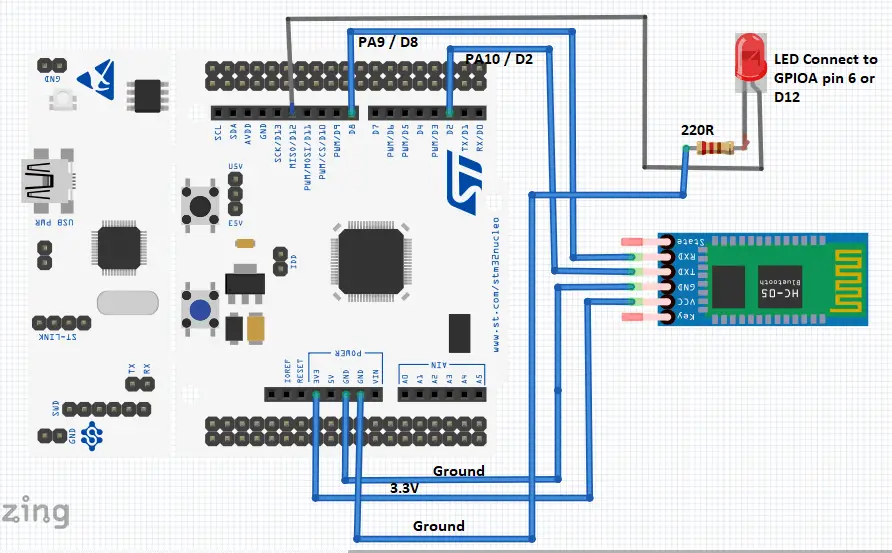
Stm32 and HC-05 connection
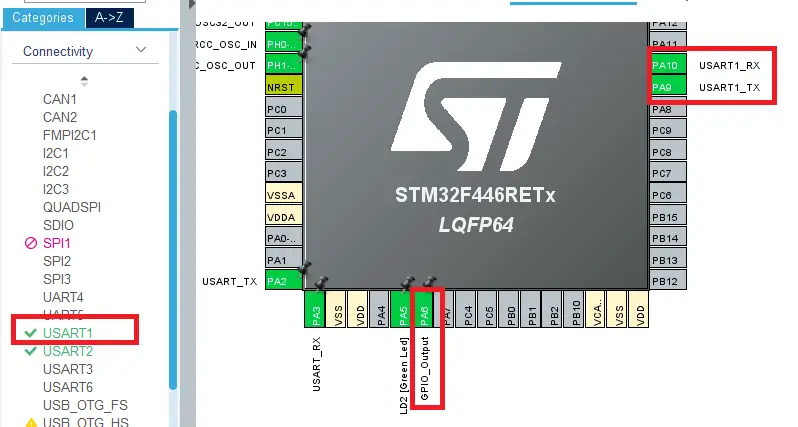
In this project, we are using UART1 of the stm32 Nucleo board. We will configure GPIO 9 of port A as UART1_TX and GPIO 10 of port A as UART1_RX. Also add a LED to GPIO 6 of port A.
Circuit Diagram
Preparing Bluetooth terminal application
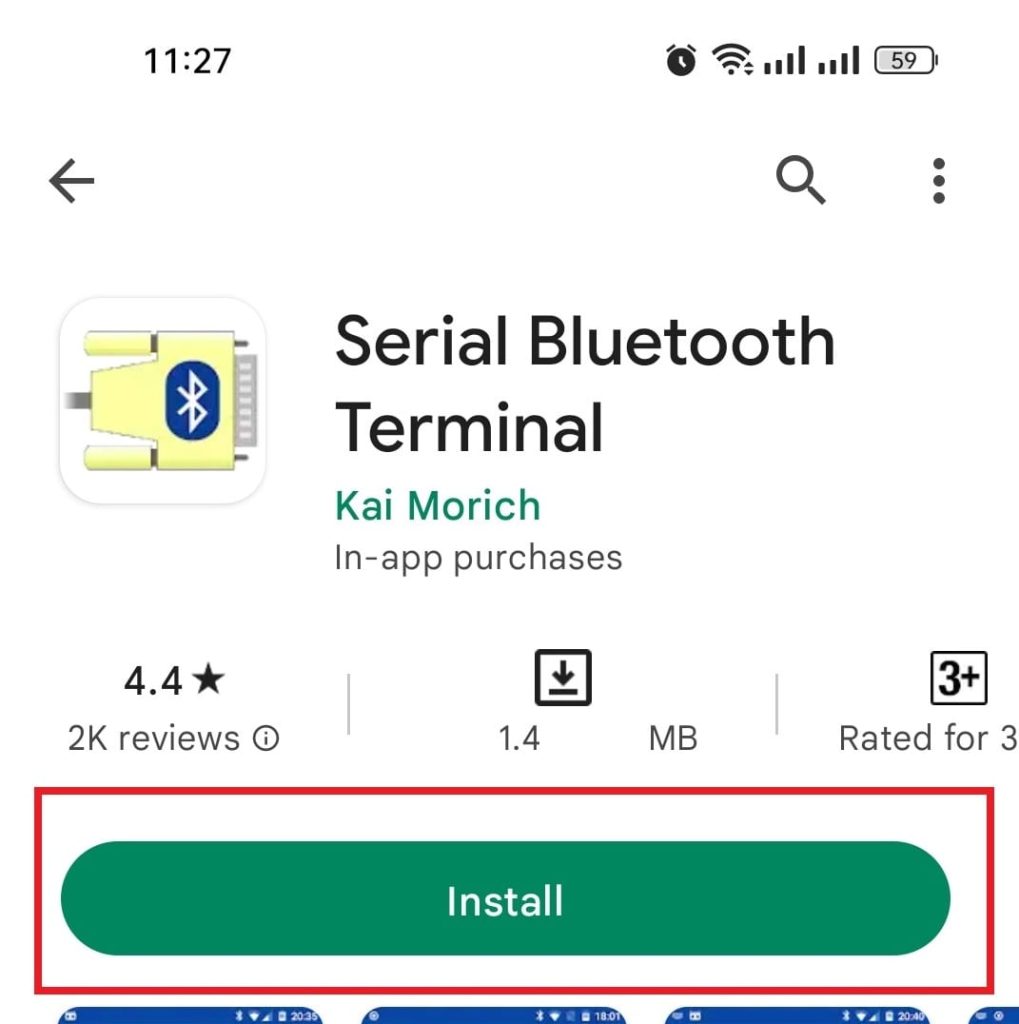
Step 1: Go to the google play store from your Andriod phone and search for “Bluetooth Terminal” select the application shown below and hit install. After install the application open it.
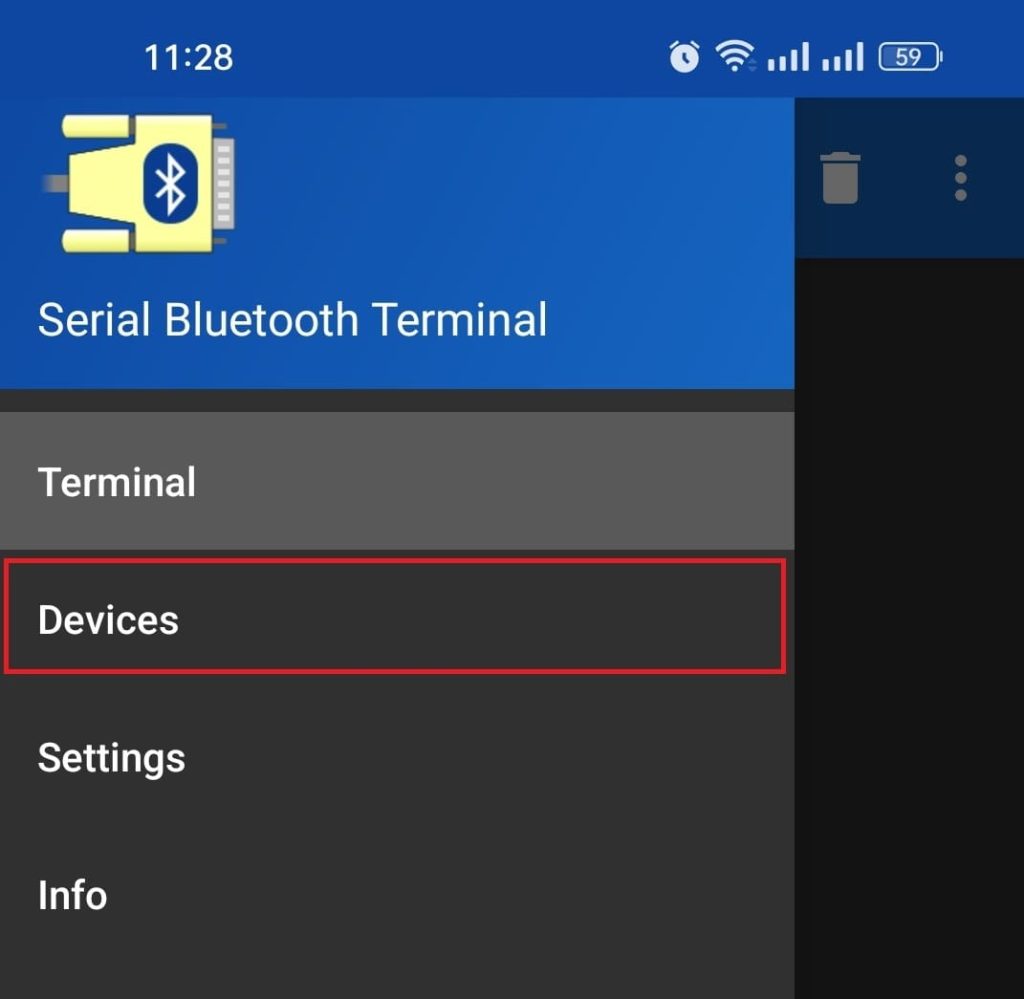
Step 2: Go to the devices option from the application
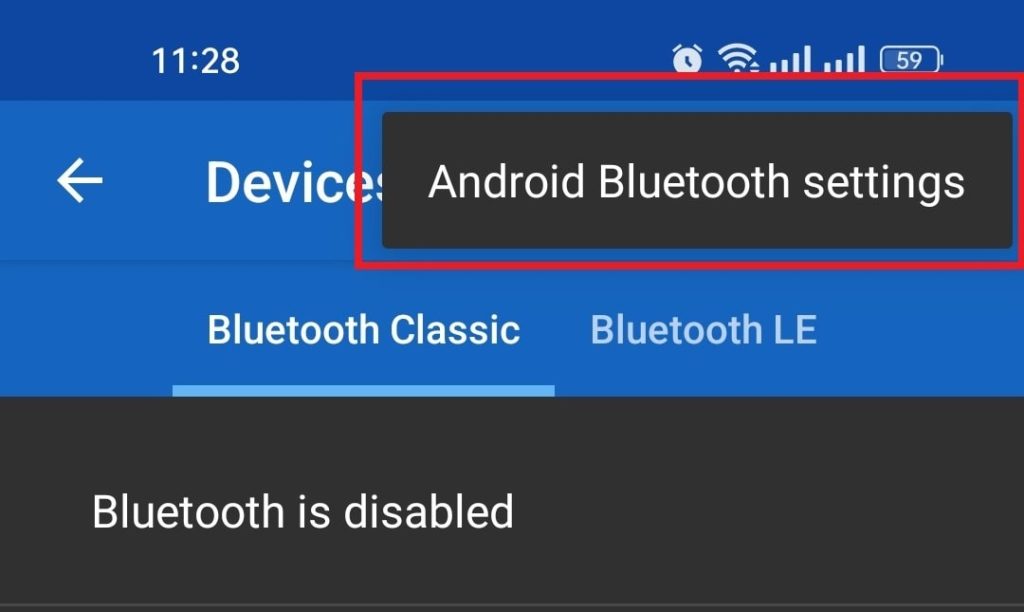
Step 3: Then select “Andriod Bluetooth Settings”
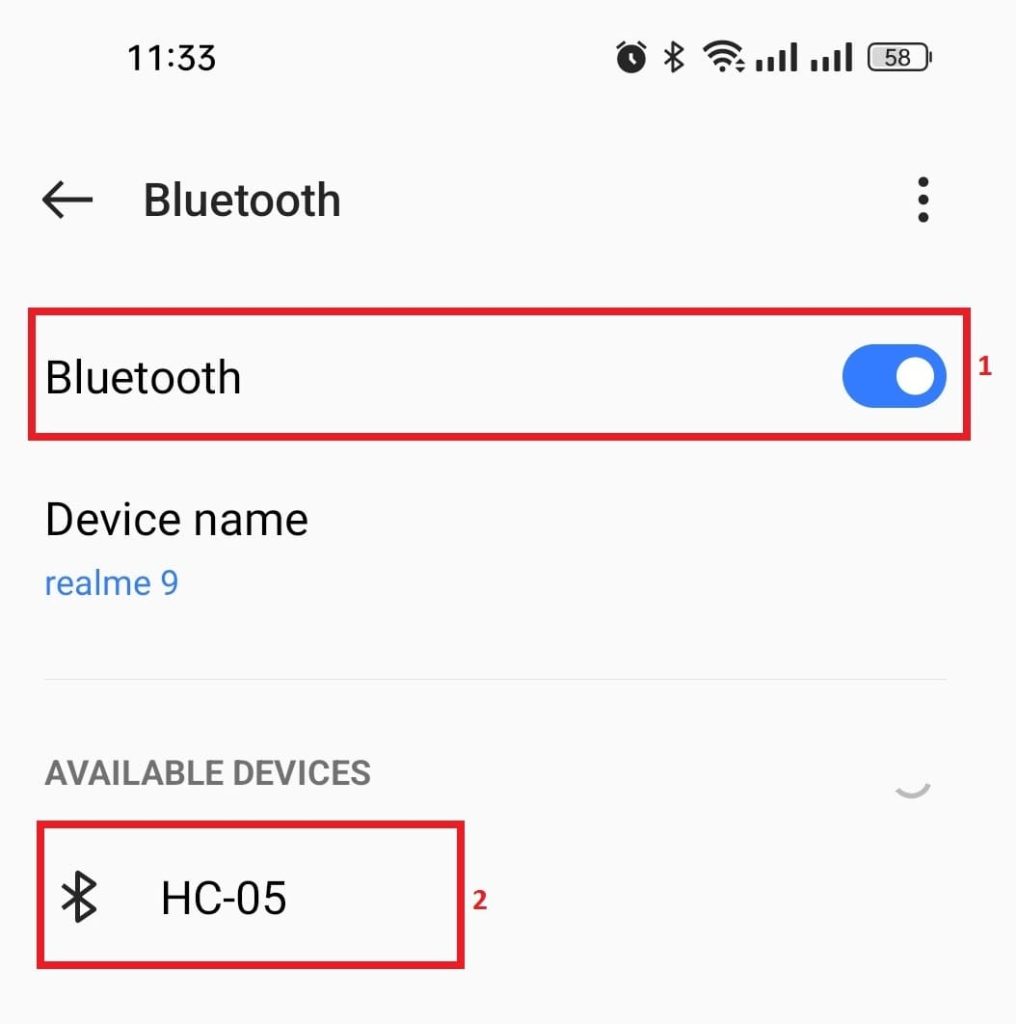
Step 4: Enable your Bluetooth and select HC-05 Bluetooth from the drop-down menu.
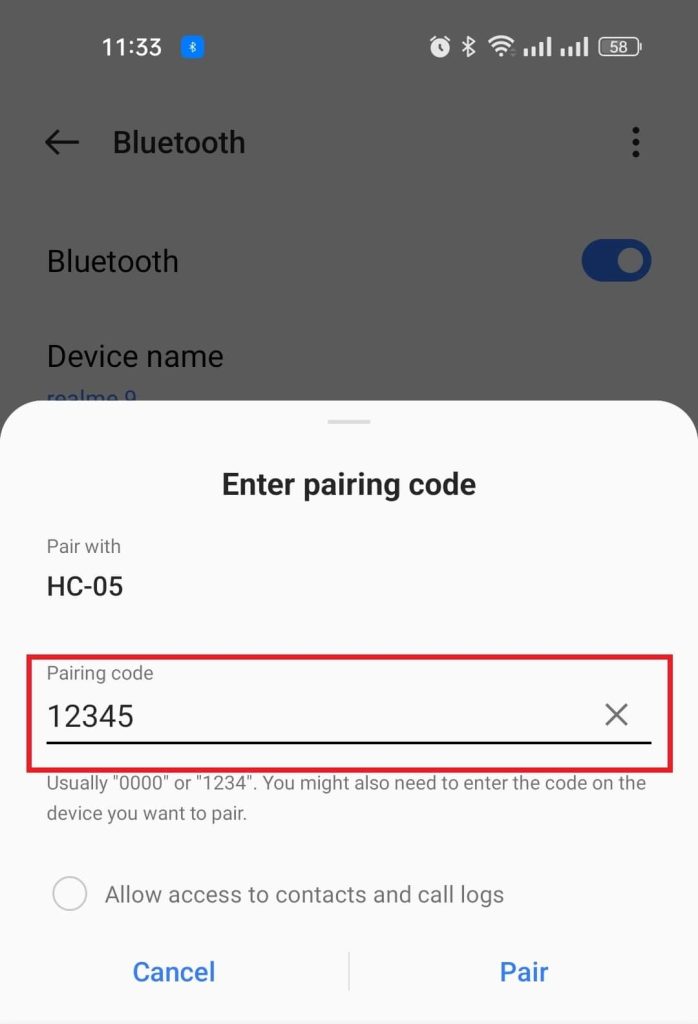
Step 5: Now, Enter the pairing password and click on Pair.
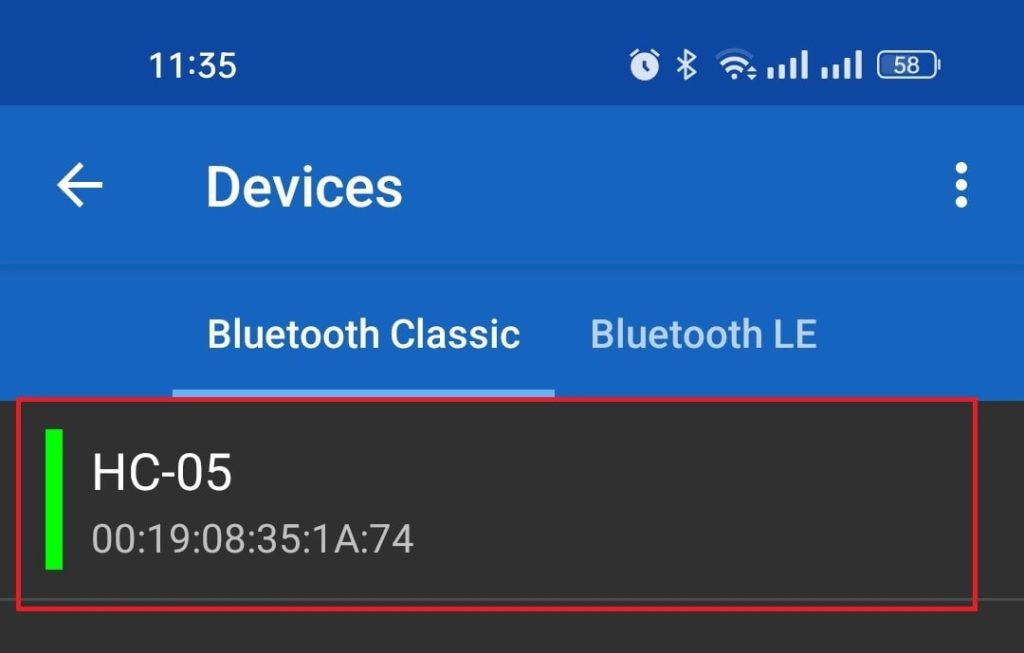
Step 6: Go back to your Serial terminal application and click on devices. You will see that your bluetooth module HC-05 is paired with your smartphone.
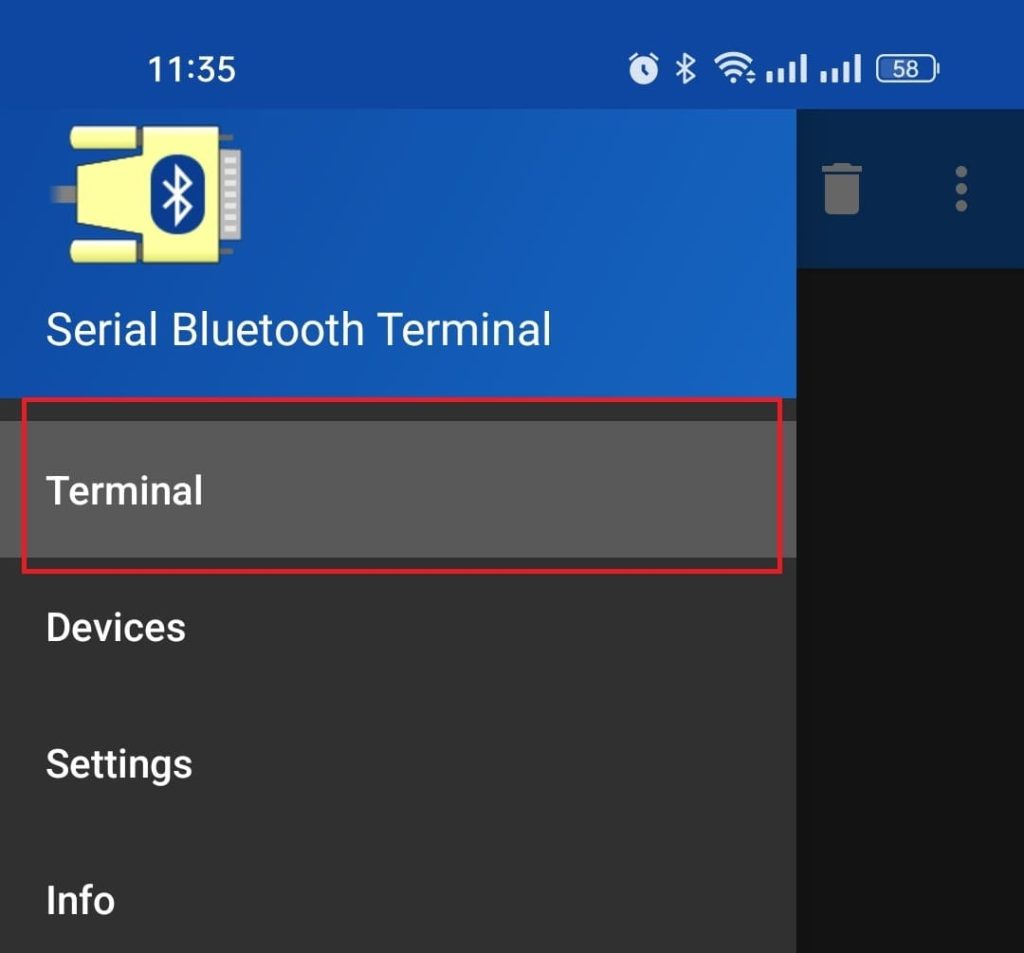
Step 7: Finally click on Terminal of the serial monitor application and start sending commands to your Bluetooth module
Project creation in Stm32CubeIDE
For project creation in Stm32CubeIDE, please visit your previous blog. Link is given below:
After creating the project in Stm32CubeIDE, Enable the USART 1 peripheral from the device configuration tools of Stm32CubeIDE. Also, Enable the GPIO 6 of PORT A to control the LED.
C code for controlling led by using Stm32 and Bluetooth
main.c file
#include "main.h"
#include <stdio.h>
#include <string.h>

UART_HandleTypeDef huart1; //Handle variable for UART1
UART_HandleTypeDef huart2; //Handle variable for UART2

void SystemClock_Config(void); //Clock configuration funtion
static void MX_GPIO_Init(void); // GPIO Initialization function
static void MX_USART2_UART_Init(void); // UART1 Initialization function
static void MX_USART1_UART_Init(void); // UART2 Initialization function

char *demo_string = "Hello, EmbeddedThere\r\n"; //demo string
uint8_t recv_char;
uint8_t recv_str[20];
int i=0;
char *on = "on";
char *off = "off";
uint8_t ft = 76;

int main(void)
{
  HAL_Init();
  SystemClock_Config();
  MX_GPIO_Init();
  MX_USART2_UART_Init();
  MX_USART1_UART_Init();
  HAL_UART_Transmit(&huart2, (uint8_t*)demo_string, strlen(demo_string), HAL_MAX_DELAY); //print to any computer serial monitor (use Putty or any serial monitor software for PC)
  HAL_UART_Receive_IT(&huart1, &recv_char, 1); //UART1 Interrupt call
  while (1)
  {

  }
}

void HAL_UART_RxCpltCallback(UART_HandleTypeDef *huart){
    if(huart->Instance == USART1 ){
        if(recv_char == '\r'){

	    HAL_UART_Transmit(&huart2, recv_str, i, HAL_MAX_DELAY);

	        if(!strcmp(recv_str, on)){
		    HAL_GPIO_WritePin(GPIOA, GPIO_PIN_6, SET);
		}
		if(!strcmp(recv_str, off)){
		    HAL_GPIO_WritePin(GPIOA, GPIO_PIN_6, RESET);
	        }

		memset(recv_str, 0, i);
		i=0;
		}else{
		    if(recv_char == '\r' || recv_char == '\n'){
		} else{
		    recv_str[i++] = recv_char;
		}
	 }
	 HAL_UART_Receive_IT(&huart1, &recv_char, 1); //UART1 Interrupt call

    }
}
Please Note: I have not included some parts of the code which are auto-generated by STM32CubeIDE.